Lincoln Navigator: Engine - 3.5L EcoBoost (272kW/370PS) / Crankshaft Pulley. Removal and Installation
Special Tool(s) / General Equipment
 |
303-102 Installer, Crankshaft Pulley |
| Strap Wrench | |
| Three Leg Puller | |
Removal
NOTICE: During engine repair procedures, cleanliness is extremely important. Any foreign material, including any material created while cleaning gasket surfaces, that enters the oil passages, coolant passages or the oil pan may cause engine failure.
-
Remove the accessory drive belt.
Refer to: Accessory Drive Belt (303-05 Accessory Drive - 3.5L EcoBoost (272kW/370PS), Removal and Installation).
-
-
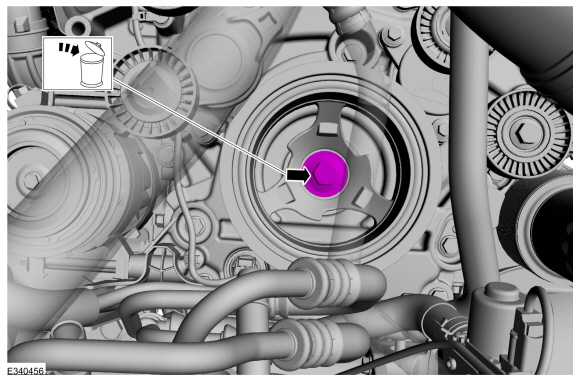
Remove the crankshaft pulley bolt and washer.
-
Discard the bolt.
-
Remove the crankshaft pulley bolt and washer.
 |
-
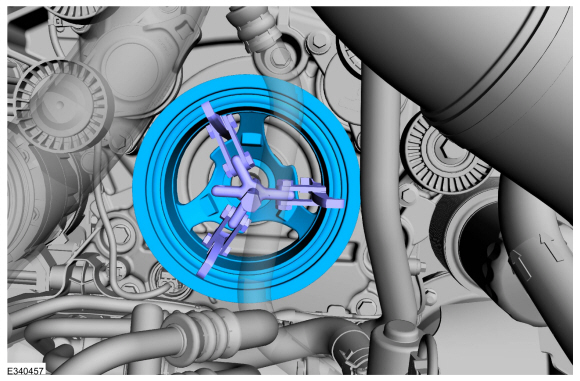
Using a three leg puller, remove the crankshaft pulley.
Use the General Equipment: Three Leg Puller
 |
Installation
-
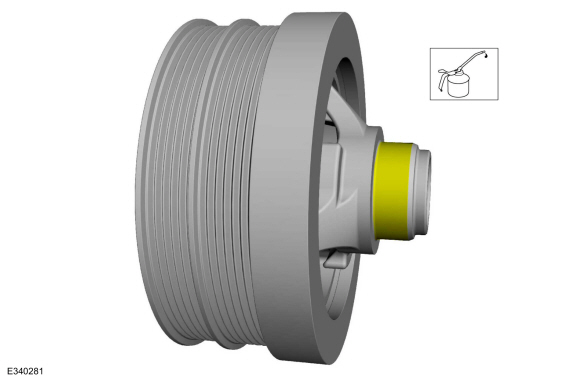
Lubricate the crankshaft pulley with clean engine oil.
Refer to: Specifications (303-01) .
 |
-
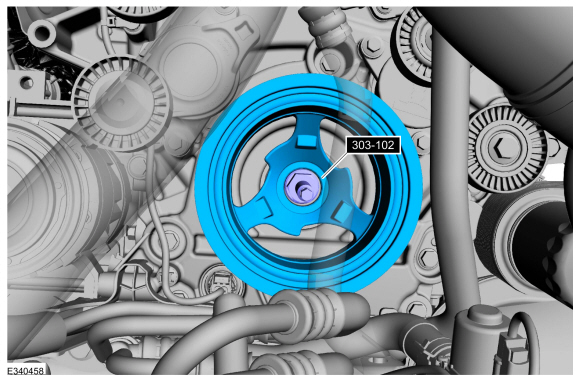
Using the special tools, install the crankshaft pulley.
Use Special Service Tool: 303-102 Installer, Crankshaft Pulley.
 |
-
Using the strap wrench, install the new crankshaft bolt and the washer and tighten in 3 stages.
Use the General Equipment: Strap Wrench
Torque:
Stage 1: 37 lb.ft (50 Nm)
Stage 2: 90°
Stage 3: 60°
 |
-
Install the accessory drive belt.
Refer to: Accessory Drive Belt (303-05 Accessory Drive - 3.5L EcoBoost (272kW/370PS), Removal and Installation).

 Crankshaft Rear Seal. Removal and Installation
Materials
Name
Specification
Motorcraft® High Performance Engine RTV SiliconeTA-357
WSE-M4G323-A6
Engine Oil - SAE 5W-30 - Synthetic Blend Motor OilXO-5W30-Q1SP
WSS-M2C946-B1
Removal
NOTICE:
During engine repair procedures, cleanliness is extremely
important...
Other information:
Lincoln Navigator 2018-2025 Workshop Manual: Rear Halfshaft Seal. Removal and Installation
Special Tool(s) / General Equipment 205-907Handle, 32 DriverTKIT-2008DH-FLM 206-034 (T88P-20202-B) Installer, Wheel Speed Sensor RingTKIT-1988-FLMTKIT-1988-LM Feeler Gauge Removal NOTE: Removal steps in this procedure may contain installation details...
Lincoln Navigator 2018-2025 Workshop Manual: Cylinder Head. Disassembly and Assembly of Subassemblies
Special Tool(s) / General Equipment 303-1249Valve Spring CompressorTKIT-2006UF-FLMTKIT-2006UF-ROW 303-1418Compressor, Valve SpringTKIT-2008ET-FLMTKIT-2008ET-ROW 303-1567Sizer, Teflon SealTKIT-2010C-FLM 303-300 (T87C-6565-A) Set, Valve Spring CompressorTKIT-1988-FESTIVAT88C-1000-STTKIT-1988-TRACERTKIT-2009TC-F 303-350 (T89P-6565-A) Com..
Categories
- Manuals Home
- 4th Gen Lincoln Navigator Service Manual (2018 - 2025)
- Front Bumper Cover. Removal and Installation
- SYNC Module [APIM]. Removal and Installation
- Vehicle Dynamics Control Module (VDM). Removal and Installation
- Brake Service Mode Activation and Deactivation. General Procedures
- Remote Function Actuator (RFA) Module. Removal and Installation
Axle Tube Bearing. Removal and Installation
Special Tool(s) / General Equipment
 205-123
(T78P-1177-A)
205-123
(T78P-1177-A)
Installer, Axle Shaft Oil Seal
 308-047
(T77F-1102-A)
308-047
(T77F-1102-A)
Remover, Bearing Cup Slide Hammer