Lincoln Navigator: Roof Sheet Metal Repairs / Roof Reinforcement. Removal and Installation
Special Tool(s) /
General Equipment
| 6.5 mm Drill Bit |
| Self-Piercing Rivet (SPR) Remover/Installer |
| Belt Sander |
| Blind Rivet Gun |
| Locking Pliers |
Materials
| Name |
Specification |
Metal Bonding Adhesive
TA-1, TA-1-B, 3M™ 08115, LORD Fusor® 108B, Henkel Teroson EP 5055 |
-
|
Removal
NOTE:
The following procedure details removal and installation of
all the roof panel reinforcements as required. Adjust to meet repair
needs.
NOTE:
Aluminum body panels are highly receptive to heat transfer.
With the extensive use of structural adhesives and non-structural
sealers used in vehicle construction, the potential of heat transfer
could impact adhesives and sealers in non-associated panels during the
repair process. Many repairs areas that utilize structural adhesive may
be separated after fastener removal by using a panel chisel along the
joint/flange. Using heat not exceeding 425° F to loosen a bonded panel
should only be done when all panels in the joint will be replaced and
new adhesive applied.
-
Remove the roof outer panel.
Refer to: Roof Panel (501-28 Roof Sheet Metal Repairs, Removal and Installation).
Refer to: Roof Panel - Vehicles With: Roof Opening Panel (501-28 Roof Sheet Metal Repairs, Removal and Installation).
-
NOTE:
Vehicles without roof opening panel.
NOTE:
The front roof reinforcement(s) are provided as 4
service parts (roof reinforcement, center reinforcement and K-braces),
the following steps assume all components are to be replaced. Adjust to meet repair needs.
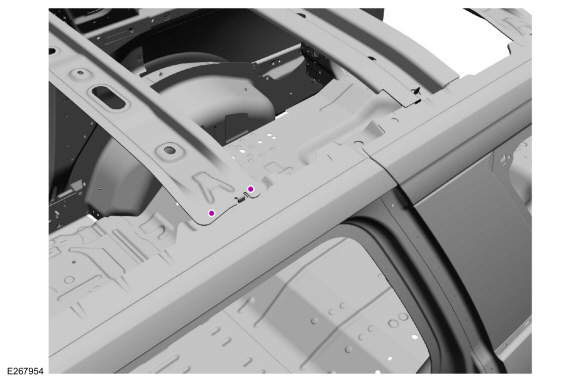
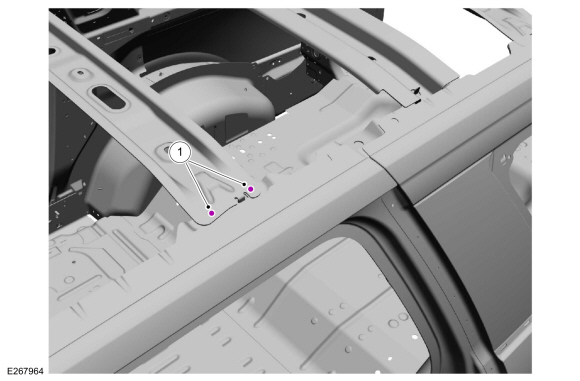
Remove the roof reinforcement SPR fasteners as required.
Use the General Equipment: Self-Piercing Rivet (SPR) Remover/Installer
Use the General Equipment: Belt Sander
-
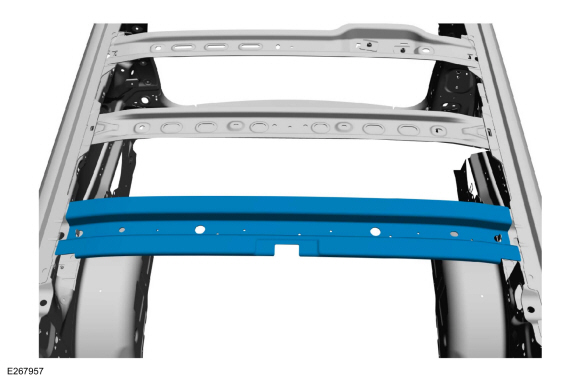
Remove the roof reinforcement.
-
Remove the roof reinforcement SPR fasteners on both sides.
Use the General Equipment: Self-Piercing Rivet (SPR) Remover/Installer
Use the General Equipment: Belt Sander
-
Remove the roof reinforcement.
-
Remove the roof reinforcement SPR fasteners on both sides.
Use the General Equipment: Self-Piercing Rivet (SPR) Remover/Installer
Use the General Equipment: Belt Sander
-
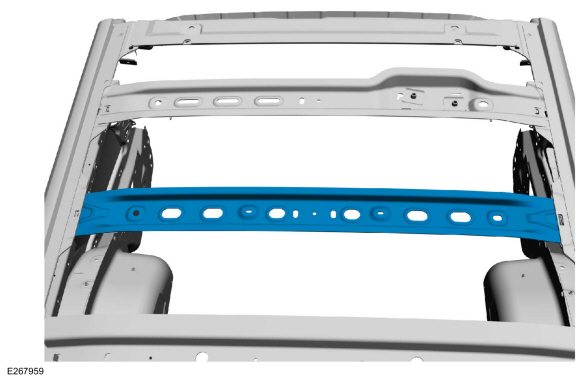
Remove the roof reinforcement.
-
Remove the roof reinforcement SPR fasteners on both sides.
Use the General Equipment: Self-Piercing Rivet (SPR) Remover/Installer
Use the General Equipment: Belt Sander
-
Remove the roof reinforcement.
-
NOTE:
Vehicles with long wheelbase (LWB).
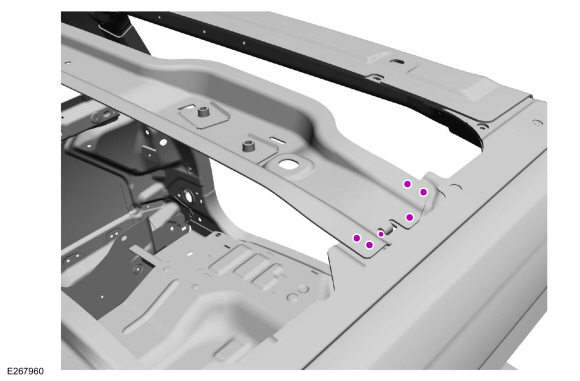
Remove the roof reinforcement SPR fasteners on both sides.
Use the General Equipment: Self-Piercing Rivet (SPR) Remover/Installer
Use the General Equipment: Belt Sander
-
NOTE:
Vehicles with long wheelbase (LWB).
Remove the roof reinforcement.
Installation
NOTE:
SPR fasteners may not be placed directly over original SPR location.
They must be placed adjacent to original location matching original
quantity.
NOTE:
Solid rivets or blind fasteners may be used in place of SPR fasteners after enlarging the existing hole to 6.5 mm.
-
Apply adhesive to the mating surfaces on both sides.
Material: Metal Bonding Adhesive
/ TA-1, TA-1-B, 3M™ 08115, LORD Fusor® 108B, Henkel Teroson EP 5055
-
Install the roof reinforcements and clamp in position.
Refer to: Joining Techniques (501-25 Body Repairs - General Information, General Procedures).
Use the General Equipment: Locking Pliers
-
NOTE:
Solid rivets or blind fasteners may be used in place of SPR fasteners after enlarging the existing hole to 6.5 mm.
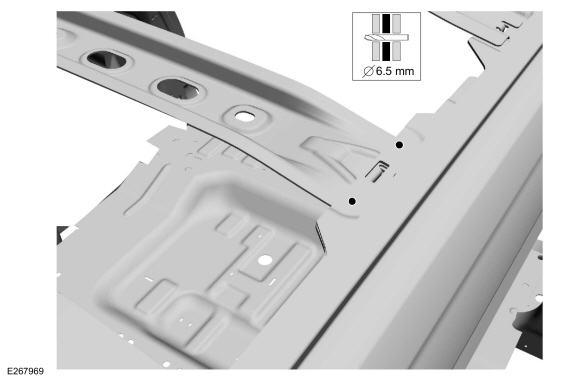
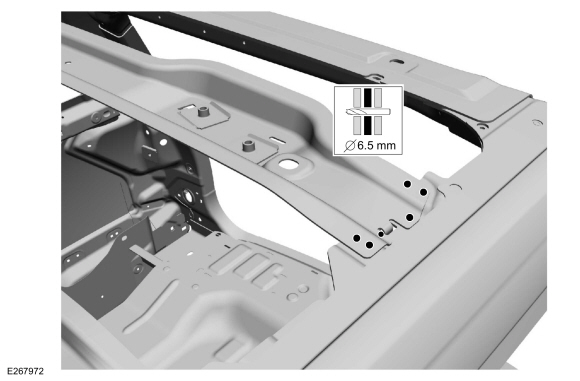
Drill holes for rivets as indicated.
Use the General Equipment: 6.5 mm Drill Bit
-
Install blind rivet fasteners.
|
Item
|
SPR Number
|
SPR Code
|
Henrob® Mandrel
|
Pro-Spot® Mandrel
|
Blind Rivet
|
Solid rivet
|
Rivnut®
|
|
1
|
-
|
-
|
-
|
-
|
W708777-S900C
|
W790377-S900
|
-
|
|
2
|
-
|
-
|
-
|
-
|
W708777-S900C
|
W790377-S900
|
-
|
|
3
|
-
|
-
|
-
|
-
|
W702512-S900C
|
W790376-S900
|
-
|
Use the General Equipment: Blind Rivet Gun
-
Apply adhesive to the mating surface on both sides.
Material: Metal Bonding Adhesive
/ TA-1, TA-1-B, 3M™ 08115, LORD Fusor® 108B, Henkel Teroson EP 5055
-
Install the roof reinforcement and clamp in position.
Use the General Equipment: Locking Pliers
-
Drill holes for rivets on both sides as indicated.
Use the General Equipment: 6.5 mm Drill Bit
-
NOTE:
SPR fasteners may not be placed directly over original SPR location.
They must be placed adjacent to original location matching original
quantity.
NOTE:
Solid rivets or blind fasteners may be used in place of SPR fasteners after enlarging the existing hole to 6.5 mm.
Install fasteners on both sides.
|
Item
|
SPR Number
|
SPR Code
|
Henrob® Mandrel
|
Pro-Spot® Mandrel
|
Blind Rivet
|
Solid rivet
|
Rivnut®
|
|
1
|
-
|
-
|
-
|
-
|
W702512-S900C
|
W790376-S900
|
-
|
Use the General Equipment: Blind Rivet Gun
-
Apply adhesive to the mating surface on both sides.
Material: Metal Bonding Adhesive
/ TA-1, TA-1-B, 3M™ 08115, LORD Fusor® 108B, Henkel Teroson EP 5055
-
Install the roof reinforcement and clamp in position.
Use the General Equipment: Locking Pliers
-
Drill holes for rivets on both sides as indicated.
Use the General Equipment: 6.5 mm Drill Bit
-
Install fasteners on both sides.
|
Item
|
SPR Number
|
SPR Code
|
Henrob® Mandrel
|
Pro-Spot® Mandrel
|
Blind Rivet
|
Solid rivet
|
Rivnut®
|
|
1
|
-
|
-
|
-
|
-
|
W702512-S900C
|
W790376-S900
|
-
|
Use the General Equipment: Blind Rivet Gun
-
Apply adhesive to mating surface on both sides.
Material: Metal Bonding Adhesive
/ TA-1, TA-1-B, 3M™ 08115, LORD Fusor® 108B, Henkel Teroson EP 5055
-
Install the roof reinforcement and clamp in position.
Use the General Equipment: Locking Pliers
-
Drill holes for rivets on both sides as indicated.
Use the General Equipment: 6.5 mm Drill Bit
-
Install fasteners on both sides.
|
Item
|
SPR Number
|
SPR Code
|
Henrob® Mandrel
|
Pro-Spot® Mandrel
|
Blind Rivet
|
Solid rivet
|
Rivnut®
|
|
1
|
-
|
-
|
-
|
-
|
W708777-S900C
|
W790376-S900
|
-
|
-
NOTE:
Vehicles with long wheelbase (LWB).
Apply adhesive to the mating surface on both sides.
Material: Metal Bonding Adhesive
/ TA-1, TA-1-B, 3M™ 08115, LORD Fusor® 108B, Henkel Teroson EP 5055
-
NOTE:
Vehicles with long wheelbase (LWB).
Install the roof reinforcement and clamp in position.
Use the General Equipment: Locking Pliers
-
NOTE:
Vehicles with long wheelbase (LWB).
Drill holes for rivets on both sides as indicated.
Use the General Equipment: Locking Pliers
-
NOTE:
Vehicles with long wheelbase (LWB).
Install fasteners on both sides.
|
Item
|
SPR Number
|
SPR Code
|
Henrob® Mandrel
|
Pro-Spot® Mandrel
|
Blind Rivet
|
Solid rivet
|
Rivnut®
|
|
1
|
-
|
-
|
-
|
-
|
W708777-S900C
|
W790376-S900
|
-
|
-
-
Long wheel base location.
-
Standard wheel base location.
-
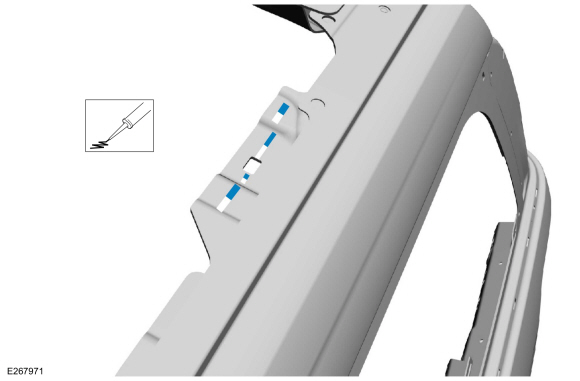
Install the NVH dampener.
-
Install the fasteners.
Torque:
133 lb.in (15 Nm)
-
Install the roof outer panel.
Refer to: Roof Panel (501-28 Roof Sheet Metal Repairs, Removal and Installation).
Refer to: Roof Panel - Vehicles With: Roof Opening Panel (501-28 Roof Sheet Metal Repairs, Removal and Installation).
Special Tool(s) /
General Equipment
6.5 mm Drill Bit
Polydrive Bit Socket
Self-Piercing Rivet (SPR) Remover/Installer
Belt Sander
Blind Rivet Gun
Locking Pliers
Materials
Name
Specification
Metal Bonding AdhesiveTA-1, TA-1-B, 3M™ 08115, LORD Fusor® 108B, Henkel Teroson EP 5055
-
Seam SealerTA-2-B, 3M™ 0..
Other information:
Special Tool(s) /
General Equipment
211-023
(T74P-3044-A1)
C-Frame and Screw
Removal
NOTICE:
Suspension fasteners are critical parts that affect the
performance of vital components and systems. Failure of these fasteners
may result in major service expense. Use the same or equivalent parts if
replacement is necessary. Do not use a replacement part of lesse..
Removal
NOTE:
Driver seat shown, passenger seat similar.
Remove the front seat cushion cover.
Refer to: Front Seat Cushion Cover (501-10A Front Seats, Removal and Installation).
Remove the pin-type retainers and the front seat cushion bolster(s).
Installation
To install, reverse the removal procedure.
..


 Roof Side Rail. Removal and Installation
 205-123
(T78P-1177-A)
205-123
(T78P-1177-A)
 308-047
(T77F-1102-A)
308-047
(T77F-1102-A)