Lincoln Navigator: Rear Disc Brake / Brake Caliper. Removal and Installation
Removal
NOTICE: Make sure that all openings are sealed.
NOTICE: If the fluid is spilled on the paintwork, the affected area must be immediately washed down with cold water.
NOTE: Removal steps in this procedure may contain installation details.
-
Activate the EPB service mode. WARNING:
Service actions on vehicles equipped with electronic
brake booster and electronic parking brakes may cause unexpected brake
application, which could result in injury to hands or fingers. Put the
brake system into service mode prior to servicing or removing any brake
components. Failure to follow this instruction may result in serious
personal injury.
WARNING:
Service actions on vehicles equipped with electronic
brake booster and electronic parking brakes may cause unexpected brake
application, which could result in injury to hands or fingers. Put the
brake system into service mode prior to servicing or removing any brake
components. Failure to follow this instruction may result in serious
personal injury.
Refer to: Electronic Parking Brake (EPB) Service Mode Activation and Deactivation (206-05) .
-
Remove the wheel and tire.
Refer to: Wheel and Tire (204-04A Wheels and Tires, Removal and Installation).
-
Disconnect the EPB actuator motor electrical connector and detach the wiring retainers.
 |
-
Remove the bolt and disconnect the brake hose. Discard the washers.
Torque: 30 lb.ft (40 Nm)
 |
-
Remove the bolt, studbolt and the brake caliper. Discard the retainers.
Torque: 26 lb.ft (35 Nm)
 |
-
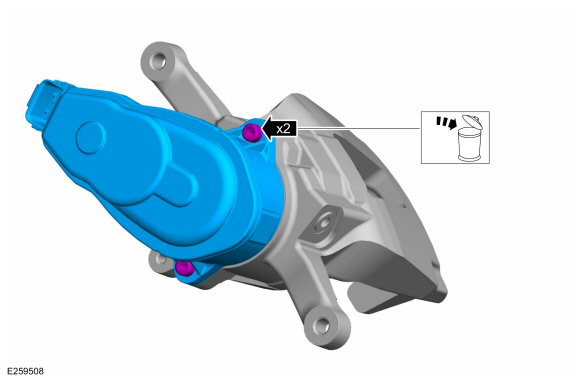
Remove the bolts and the parking brake actuator motor. Discard the bolts.
Torque: 106 lb.in (12 Nm)
 |
-
Remove and discard the O-ring.
 |
Installation
-
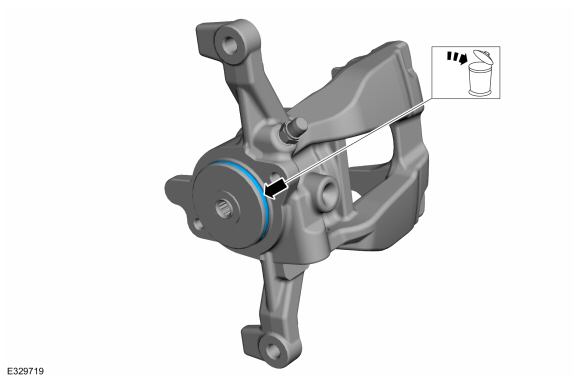
NOTICE: Do not damage the O-ring when installing the parking brake actuator motor to the brake caliper housing.
To install, reverse the removal procedure.
-
Clean the brake caliper housing O-ring groove and apply the grease supplied with the parking brake service kit.
 |
-
Deactivate the EPB service mode.
Refer to: Electronic Parking Brake (EPB) Service Mode Activation and Deactivation (206-05) .
-
Bleed the brake system.
Refer to: Brake System Pressure Bleeding (206-00 Brake System - General Information, General Procedures).

 Brake Caliper Anchor Plate. Removal and Installation
Removal
NOTE:
Removal steps in this procedure may contain installation details.
Remove the brake pads.
Refer to: Brake Pads (206-04 Rear Disc Brake, Removal and Installation)...
Other information:
Lincoln Navigator 2018-2025 Workshop Manual: Hydraulic Lash Adjuster. Removal and Installation
Removal Remove the roller finger follower. Refer to: Rocker Arm (303-01 Engine - 3.5L EcoBoost (272kW/370PS), Removal and Installation). Remove the hydraulic lash adjuster. Installation Lubricate the hydraulic lash adjuster with clean engine oil and install...
Lincoln Navigator 2018-2025 Workshop Manual: Front Drive Halfshafts. Diagnosis and Testing
Preliminary Inspection Visually inspect the CV joints, housing, boots, and clamps for obvious signs of mechanical damage. If an obvious cause for an observed or reported concern is found, correct the cause (if possible) before proceeding to the next step If the cause is not visually evident, verify the symptom and REFER to Symptom Chart: NVH...
Categories
- Manuals Home
- 4th Gen Lincoln Navigator Service Manual (2018 - 2025)
- Rear Bumper. Removal and Installation
- Transmission Fluid Level Check. General Procedures
- Windshield Washer Pump. Removal and Installation
- Front Bumper Cover. Removal and Installation
- Liftgate Trim Panel. Removal and Installation
Front Driveshaft. Removal and Installation
Special Tool(s) / General Equipment
Crimping ToolMaterials
Name Specification Motorcraft® Premium Long-Life GreaseXG-1-E1 ESA-M1C75-B
Removal
With the vehicle in NEUTRAL, position the vehicle on a hoist.Refer to: Jacking and Lifting (100-02 Jacking and Lifting, Description and Operation).
Remove the bolts and the transmission shield.