Lincoln Navigator: Front Drive Axle/Differential / Differential Case Runout Check. General Procedures
Special Tool(s) / General Equipment
 |
205-1016 Installer, Differential Bearing TKIT-2014D-ROW2 TKIT-2014D-FL_ROW |
 |
205-153
(T80T-4000-W)
Handle |
 |
205-D061
(D83T-4205-C2)
Step Plate |
| Dial Indicator | |
| Three Leg Puller | |
| Punch | |
| Copper Hammer | |
Check
-
Remove the differential.
Refer to: Differential Carrier (205-03 Front Drive Axle/Differential, Removal and Installation).
-
Remove and discard the ring gear bolts.
 |
-
NOTICE: Care should be taken not to damage the differential ring gear bolt hole threads.
Using the general equipments, remove the ring gear.
Use the General Equipment: Punch
Use the General Equipment: Copper Hammer
 |
-
Install the Differential carrier, differential carrier bearing cups and differential bearing preload shims.
 |
-
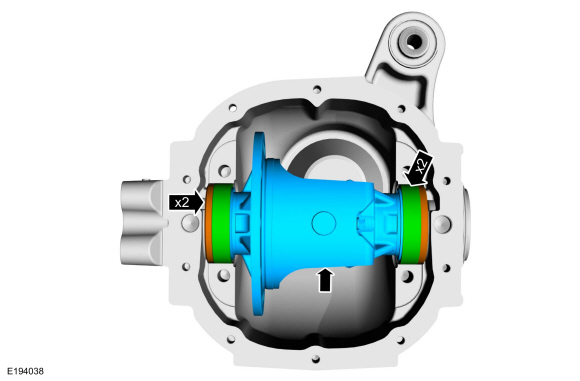
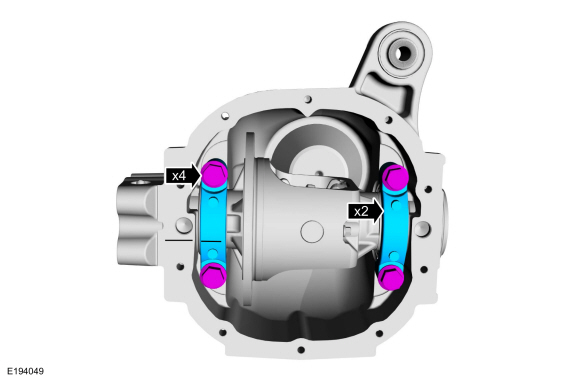
Install the differential bearing caps and bolts. Align the differential bearing caps in there original location.
Torque: 94 lb.ft (128 Nm)
 |
-
Rotate the differential carrier to make sure the bearings have seated correctly.
 |
-
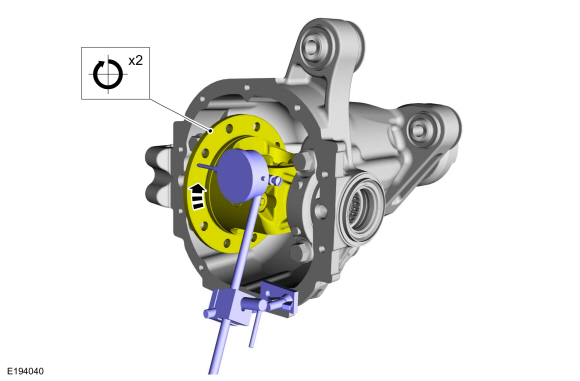
Using the dial indicator, rotate the differential carrier and measure the differential carrier runout.
-
If the runout does not exceed the specification, install a new ring gear and pinion.
Use the General Equipment: Dial Indicator
-
If runout exceeds the specification, the ring gear
is true and the condition is due to differential carrier/differential
bearing damage.
-
Inspect the differential bearings and the
differential carrier. Always install new differential bearings when
installing a new differential carrier, or if a bearing condition is
questionable.
-
If the runout does not exceed the specification, install a new ring gear and pinion.
 |
-
Remove the bolts and the differential bearing caps.
 |
-
Remove the differential carrier, differential bearing cups, and differential bearing preload shims.
|
-
NOTE: If necessary.
Using the special tool and the general equipment, remove and discard the differential bearings.
Use Special Service Tool: 205-D061 (D83T-4205-C2) Step Plate.
Use the General Equipment: Three Leg Puller
 |
-
Using the special tools, install the new differential bearings.
Use Special Service Tool: 205-153 (T80T-4000-W) Handle. , 205-1016 Installer, Differential Bearing.
 |
-
Install the Differential carrier, differential carrier bearing cups and differential bearing preload shims.
|
-
Install the differential bearing caps and bolts. Align the differential bearing caps in there original location.
|
-
Rotate the differential carrier to make sure the bearings have seated correctly.
|
-
NOTE: If the runout is still excessive, install a new differential case.
Using the dial indicator, rotate the differential carrier and measure the differential carrier runout.
Use the General Equipment: Dial Indicator
|
-
Remove the bolts and the differential bearing caps.
|
-
Remove the differential carrier, differential bearing cups, and differential bearing preload shims.
|
-
NOTE: Tighten the ring gear bolts in a cross pattern.
Install the ring gear and the new ring gear bolts.
Torque: 94 lb.ft (128 Nm)
 |
-
Install the differential carrier.
Refer to: Differential Carrier (205-03 Front Drive Axle/Differential, Removal and Installation).
 Front Drive Axle. Diagnosis and Testing
Symptom Chart(s)
Diagnostics in this manual assume a certain skill level and knowledge of Ford-specific diagnostic practices. REFER to: Diagnostic Methods (100-00 General Information, Description and Operation)...
 Differential Fluid Level Check. General Procedures
Materials
Name
Specification
Motorcraft® SAE 75W-85 Premium Synthetic Hypoid Gear LubricantXY-75W85-QL
WSS-M2C942-A
Check
With the vehicle in NEUTRAL, position it on a hoist...
Other information:
Lincoln Navigator 2018-2025 Workshop Manual: Exhaust System - System Operation and Component Description. Description and Operation
System Operation Catalyst And Exhaust Systems The catalytic converter and exhaust systems work together to control the release of harmful engine exhaust emissions into the atmosphere. The engine exhaust gas consists mainly of nitrogen (N), carbon dioxide (CO2) and water (H2O)...
Lincoln Navigator 2018-2025 Workshop Manual: Trough Assembly. Removal and Installation
Removal NOTE: Removal steps in this procedure may contain installation details. Remove the roof opening panel glass. Refer to: Roof Opening Panel Glass (501-17 Roof Opening Panel, Removal and Installation). Detach the trough assembly arms...
Categories
- Manuals Home
- 4th Gen Lincoln Navigator Service Manual (2018 - 2025)
- Body Control Module (BCM). Removal and Installation
- Rear View Mirrors - System Operation and Component Description. Description and Operation
- Vehicle Dynamics Control Module (VDM). Removal and Installation
- Front Bumper. Removal and Installation
- Brake Service Mode Activation and Deactivation. General Procedures
Rear Drive Axle and Differential. Diagnosis and Testing
Symptom Chart(s)
Diagnostics in this manual assume a certain skill level and knowledge of Ford-specific diagnostic practices.
REFER to: Diagnostic Methods (100-00 General Information, Description and Operation).
Symptom Chart - Differential
Symptom Chart - Differential
Condition Actions Axle overheating GO to Pinpoint Test A Broken gear teeth on the ring gear or pinion GO to Pi