Lincoln Navigator: Rear End Sheet Metal Repairs / Rear Floor Panel. Removal and Installation
Special Tool(s) /
General Equipment
| 6.5 mm Drill Bit |
| Self-Piercing Rivet (SPR) Remover/Installer |
| Belt Sander |
| Blind Rivet Gun |
| Knife |
| Locking Pliers |
Materials
| Name |
Specification |
Metal Bonding Adhesive
TA-1, TA-1-B, 3M™ 08115, LORD Fusor® 108B, Henkel Teroson EP 5055 |
-
|
Seam Sealer
TA-2-B, 3M™ 08308, LORD Fusor® 803DTM |
-
|
Flexible Foam Repair
3M™ 08463, LORD Fusor® 121 |
-
|
Removal
NOTE:
SPR fasteners may not be placed directly over original SPR location.
They must be placed adjacent to original location matching original
quantity.
NOTE:
Aluminum body panels are highly receptive to heat transfer.
With the extensive use of structural adhesives and non-structural
sealers used in vehicle construction, the potential of heat transfer
could impact adhesives and sealers in non-associated panels during the
repair process. Many repairs areas that utilize structural adhesive may
be separated after fastener removal by using a panel chisel along the
joint/flange. Using heat not exceeding 425° F to loosen a bonded panel
should only be done when all panels in the joint will be replaced and
new adhesive applied.
NOTE:
Flow drill screws are not reused. Remove and discard.
NOTE:
Short wheelbase (SWB) shown, long wheelbase (LWB) similar.
-
Depower the SRS .
Refer to: Supplemental Restraint System (SRS) Depowering (501-20B Supplemental Restraint System, General Procedures).
-
Verify the vehicle is dimensionally correct.
Refer to: Body and Frame (501-26 Body Repairs - Vehicle Specific Information and Tolerance Checks, Description and Operation).
-
Remove the D-pillar trim.
Refer to: D-Pillar Trim Panel - Long Wheelbase (501-05 Interior Trim and Ornamentation, Removal and Installation).
Refer to: D-Pillar Trim Panel - Short Wheelbase (501-05 Interior Trim and Ornamentation, Removal and Installation).
-
Remove the loadspace trim panels.
Refer to: Loadspace Trim Panel (501-05 Interior Trim and Ornamentation, Removal and Installation).
-
Remove the subwoofer speaker.
Refer to: Subwoofer Speaker (415-00 Information and Entertainment
System - General Information - Vehicles With: SYNC 4, Removal and
Installation).
-
Remove the fuel tank filler pipe.
Refer to: Fuel Tank Filler Pipe (310-01 Fuel Tank and Lines - 3.5L EcoBoost (272kW/370PS), Removal and Installation).
-
Position aside the carpeting, all modules and wiring harnesses.
-
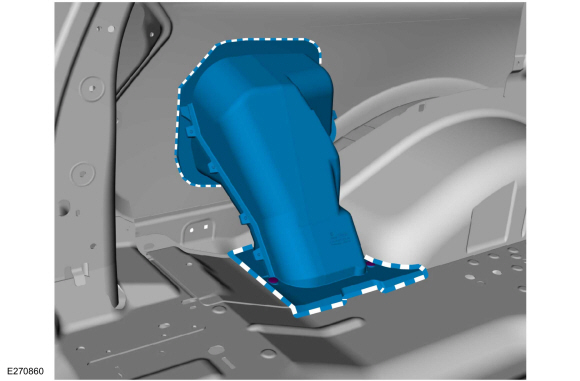
Cut the NVH foam attaching the fuel pipe housing and remove.
Use the General Equipment: Knife
-
Remove the rivet fasteners.
Use the General Equipment: Self-Piercing Rivet (SPR) Remover/Installer
Use the General Equipment: Belt Sander
-
Remove the rivet fasteners.
Use the General Equipment: Self-Piercing Rivet (SPR) Remover/Installer
Use the General Equipment: Belt Sander
-
On Both Sides:
Remove the fasteners.
Use the General Equipment: Self-Piercing Rivet (SPR) Remover/Installer
Use the General Equipment: Belt Sander
-
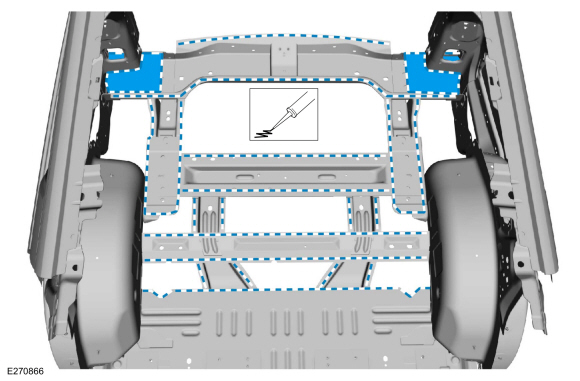
Break the adhesive bond and remove the rear floor panel.
Installation
NOTE:
Aluminum body panels are highly receptive to heat transfer.
With the extensive use of structural adhesives and non-structural
sealers used in vehicle construction, the potential of heat transfer
could impact adhesives and sealers in non-associated panels during the
repair process. Many repairs areas that utilize structural adhesive may
be separated after fastener removal by using a panel chisel along the
joint/flange. Using heat not exceeding 425° F to loosen a bonded panel
should only be done when all panels in the joint will be replaced and
new adhesive applied.
NOTE:
Blind or solid rivet fasteners may be used in place of SPR fasteners
after enlarging holes to 6.5 mm and must equal original quantity.
-
Use a hammer and dolly dedicated to aluminum repair to repair any damage to the flange mating surfaces.
Refer to: Special Repair Considerations for Aluminum Repairs (501-25
Body Repairs - General Information, Description and Operation).
-
80-120 Grit Sand Paper:
Sand and clean the replacement floor panel mating surfaces.
-
80-120 Grit Sand Paper:
Sand and clean the underbody mating surfaces.
-
Apply adhesive to the mating surfaces, and NVH foam to D-pillar corners as noted during removal.
Material: Metal Bonding Adhesive
/ TA-1, TA-1-B, 3M™ 08115, LORD Fusor® 108B, Henkel Teroson EP 5055
Material: Flexible Foam Repair
/ 3M™ 08463, LORD Fusor® 121
-
With the aid of an assistant, position and install the floor panel.
Use the General Equipment: Locking Pliers
-
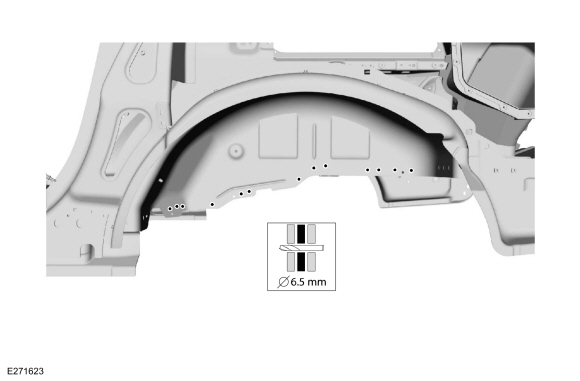
Drill for blind rivet fasteners.
Use the General Equipment: 6.5 mm Drill Bit
-
Install blind rivet fasteners.
|
Item
|
SPR Number
|
SPR Code
|
Henrob® Mandrel
|
Pro-Spot® Mandrel
|
Blind Rivet
|
Solid Rivet
|
Rivnut®
|
|
1
|
-
|
-
|
-
|
-
|
W702512-S900C
|
-
|
-
|
Use the General Equipment: Blind Rivet Gun
-
Drill for blind rivet fasteners.
Use the General Equipment: 6.5 mm Drill Bit
-
Install blind rivet fasteners.
|
Item
|
SPR Number
|
SPR Code
|
Henrob® Mandrel
|
Pro-Spot® Mandrel
|
Blind Rivet
|
Solid Rivet
|
Rivnut®
|
|
1
|
-
|
-
|
-
|
-
|
W702512-S900C
|
-
|
-
|
|
2
|
-
|
-
|
-
|
-
|
W708777-S900C
|
-
|
-
|
|
3
|
-
|
-
|
-
|
-
|
W708778-S900C
|
-
|
-
|
|
4
|
-
|
-
|
-
|
-
|
W707638-S900C
|
-
|
-
|
Use the General Equipment: Blind Rivet Gun
-
Drill for blind rivet fasteners.
Use the General Equipment: 6.5 mm Drill Bit
-
Install rivet fasteners on both sides.
|
Item
|
SPR Number
|
SPR Code
|
Henrob® Mandrel
|
Pro-Spot® Mandrel
|
Blind Rivet
|
Solid Rivet
|
Rivnut®
|
|
1
|
-
|
-
|
-
|
-
|
W707638-S900C
|
W790377-S900
|
-
|
|
2
|
-
|
-
|
-
|
-
|
W708777-S900C
|
W790377-S900
|
-
|
|
3
|
-
|
-
|
-
|
-
|
W702512-S900C
|
W790376-S900
|
-
|
Use the General Equipment: Blind Rivet Gun
-
Metal finish the repair using typical aluminum metal finishing techniques and a fiber-based body filler.
Refer to: Special Repair Considerations for Aluminum Repairs (501-25
Body Repairs - General Information, Description and Operation).
-
Seam Sealing:
All areas must be sealed to production level.
Material: Seam Sealer
/ TA-2-B, 3M™ 08308, LORD Fusor® 803DTM
-
Refinish the repair area using a Ford approved paint system and typical refinishing techniques.
-
Apply flexible foam to fuel pipe housing flanges, install push clips and clamp in position.
Material: Flexible Foam Repair
/ 3M™ 08463, LORD Fusor® 121
-
Install the fuel tank filler pipe.
Refer to: Fuel Tank Filler Pipe (310-01 Fuel Tank and Lines - 3.5L EcoBoost (272kW/370PS), Removal and Installation).
-
Install the subwoofer speaker.
Refer to: Subwoofer Speaker (415-00 Information and Entertainment
System - General Information - Vehicles With: SYNC 4, Removal and
Installation).
-
Reposition all modules, wiring harnesses and the carpeting to original locations.
-
Install the D-pillar trim.
Refer to: D-Pillar Trim Panel - Long Wheelbase (501-05 Interior Trim and Ornamentation, Removal and Installation).
Refer to: D-Pillar Trim Panel - Short Wheelbase (501-05 Interior Trim and Ornamentation, Removal and Installation).
-
Install the loadspace trim panels.
Refer to: Loadspace Trim Panel (501-05 Interior Trim and Ornamentation, Removal and Installation).
-
Repower the SRS .
Refer to: Supplemental Restraint System (SRS) Repowering (501-20B Supplemental Restraint System, General Procedures).
Special Tool(s) /
General Equipment
6.5 mm Drill Bit
Polydrive Bit Socket
Rivet Gun
Self-Piercing Rivet (SPR) Remover/Installer
Belt Sander
Locking Pliers
Materials
Name
Specification
Metal Bonding AdhesiveTA-1, TA-1-B, 3M™ 08115, LORD Fusor® 108B, Henkel Teroson EP 5055
-
Seam SealerTA-2-B, 3M™ 08308, ..
Other information:
Special Tool(s) /
General Equipment
Boot Clamp Pliers
Materials
Name
Specification
Motorcraft® Premium Long-Life GreaseXG-1-E1
ESA-M1C75-B
Removal
Remove the tie rod end.
Refer to: Tie Rod End (211-02 Power Steering, Removal and Installation).
Remove the tie rod end jamb nut.
..
Removal
WARNING:
The following procedure prescribes critical repair steps
required for correct supplemental restraint system operation during a
crash. Follow all notes and steps carefully. Failure to follow step
instructions may result in incorrect operation of the supplemental
restraint system and increases the risk of serious personal injury or
death in a crash.
..


 Rear Floor Panel Crossmember. Removal and Installation