Lincoln Navigator: Roof Opening Panel / Roof Opening Panel Glass Bracket. Removal and Installation
Materials
| Name | Specification |
|---|---|
| Door Latch Lubricant 5U7Z-19A501-A |
- |
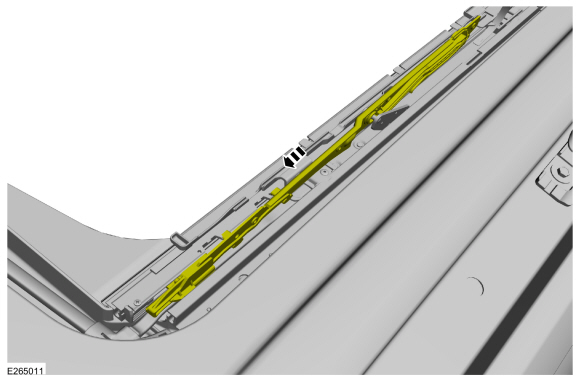
Removal
NOTE: The LH and RH roof opening glass brackets must be replaced as a pair.
NOTE: LH side shown, RH similar.
-
Remove the trough assembly.
Refer to: Trough Assembly (501-17 Roof Opening Panel, Removal and Installation).
-
Press the glass vent switch to place the glass brackets in the VENT position.
-
NOTICE: Do not allow grease to get on the deflector material.
-
Remove the screw.
-
Push down on the deflector.
-
NOTE: Note the position of the component before removal.
Remove the stop.
-
Remove the screw.
 |
-
-
Pry outward on the glass bracket until the second tab on the glass arm is disengaged from the trough slider.
-
Slide the trough slider rearward until the rear set plate screw is accessible.
-
Pry outward on the glass bracket until the second tab on the glass arm is disengaged from the trough slider.
 |
-
Remove the screws and the set plate.
 |
-
Slide the glass bracket rearward until the trolly pin is aligned with the hole in the bracket.
 |
-
NOTICE: Do not raise the glass arm more than 5 mm (0.196 inch) higher than the trolly pin or damage can occur.
Detach the glass bracket from the trolly pin and set the bracket on the trolly pin.
 |
-
NOTICE: Do not allow grease to get on the deflector material.
-
Push down on the deflector.
-
Slide the glass bracket forward out of the track and remove the roof opening panel glass arm.
-
Push down on the deflector.
 |
Installation
-
Apply the specified grease to the glass bracket cam slots.
Material: Door Latch Lubricant / 5U7Z-19A501-A
 |
-
Apply the specified grease to the glass bracket pins.
Material: Door Latch Lubricant / 5U7Z-19A501-A
 |
-
-
Push down on the deflector.
-
Install the glass bracket, inserting the inboard bracket shoe into the inside track first.
-
Push down on the deflector.
 |
-
-
Slide the glass bracket rearward aligning the hole in the bracket with the trolly pin.
-
Attach the glass arm to the trolly pin.
-
Slide the glass bracket rearward aligning the hole in the bracket with the trolly pin.
 |
-
-
Press down on the deflector.
-
Install the stop.
-
Install the screw.
Torque: 6 lb.in (0.7 Nm)
-
Press down on the deflector.
 |
-
Slide the glass bracket and forward until it contacts the stop.
 |
-
Install the set plate and the screws.
Torque: 6 lb.in (0.7 Nm)
|
-
-
Slide the trolly slide forward.
-
Pry outward on the glass bracket and align the tab.
-
Release pressure on the arm and engage the tab with the trough slider.
-
Slide the trolly slide forward.
 |
-
Install the trough assembly.
Refer to: Trough Assembly (501-17 Roof Opening Panel, Removal and Installation).
 Roof Opening Panel Glass. Removal and Installation
Removal
NOTE:
Removal steps in this procedure may contain installation details.
Fully open the roof opening panel shield.
Vent the roof opening panel glass...
 Roof Opening Panel Motor. Removal and Installation
Removal
NOTE:
Removal steps in this procedure may contain installation details.
NOTE:
Do not replace the roof opening panel glass motor and the
shield motor individually...
Other information:
Lincoln Navigator 2018-2025 Workshop Manual: Tire Pressure Monitoring System (TPMS) Sensor Location Calibration. General Procedures
Special Tool(s) / General Equipment 204-D081A (204-D081) Tire Pressure Monitor (TPMS) Ford Diagnostic Equipment Programming NOTE: The TPMS can be placed into learn mode using a diagnostic scan tool or manually where a diagnostic scan tool is not available...
Lincoln Navigator 2018-2025 Workshop Manual: Rear Drive Axle and Differential - Vehicles With: Electronic Limited-Slip Differential. Diagnosis and Testing
Diagnostic Trouble Code (DTC) Chart Diagnostics in this manual assume a certain skill level and knowledge of Ford-specific diagnostic practices. REFER to: Diagnostic Methods (100-00 General Information, Description and Operation). Module DTC Description Action DCMR P0745:12 Pressure Control Solenoid A: Circuit Short To Battery GO to Pinpoint Test E DCMR P..
Categories
- Manuals Home
- 4th Gen Lincoln Navigator Service Manual (2018 - 2025)
- Identification Codes. Description and Operation
- Head Up Display (HUD) Module Calibration. General Procedures
- Liftgate Trim Panel. Removal and Installation
- Body and Paint
- Brake Service Mode Activation and Deactivation. General Procedures
Rear Stabilizer Bar Link. Removal and Installation
Removal
NOTE: Removal steps in this procedure may contain installation details.
With the vehicle in NEUTRAL, position it on a hoist.Refer to: Jacking and Lifting (100-02 Jacking and Lifting, Description and Operation).
NOTE: Use the hex-holding feature to prevent the stud from turning while removing the nut.
Remove and discard the 2 rear stabilizer bar link nuts and remove the rear stabilizer bar link.Torque: 46 lb.ft (63 Nm)
