Lincoln Navigator: Fuel System - General Information - 3.5L EcoBoost (272kW/370PS) / Spring Lock Couplings. General Procedures
Special Tool(s) / General Equipment
 |
310-250 Disconnect Tool, Fuel Line TKIT-2012A-FL TKIT-2012A-ROW |
Disconnect
NOTICE: When reusing liquid or vapor tube connectors, make sure to use compressed air to remove any foreign material from the connector retaining clip area before separating from the tube or damage to the tube or connector retaining clip can occur. Apply clean engine oil to the end of the tube before inserting the tube into the connector.
NOTICE: Fuel injection equipment is manufactured to very precise tolerances and fine clearances. It is essential that absolute cleanliness is observed when working with these components or component damage can occur. Always install plugs to any open orifices or tubes.
-
If servicing a liquid fuel tube spring lock coupling, release the fuel system pressure.
Refer to: Fuel System Pressure Release (310-00 Fuel System - General Information - 3.5L EcoBoost (272kW/370PS), General Procedures).
-
Disconnect the battery ground cable.
Refer to: Battery Cables (414-01 Battery, Mounting and Cables, Removal and Installation).
-
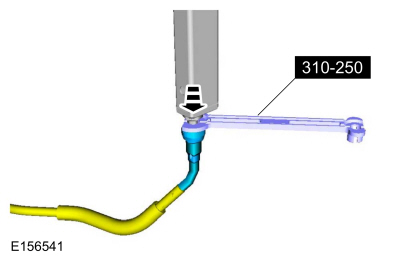
Install the Fuel Line Disconnect Tool on the tube and push into the spring lock coupling to release.
Use Special Service Tool: 310-250 Disconnect Tool, Fuel Line.
 |
-
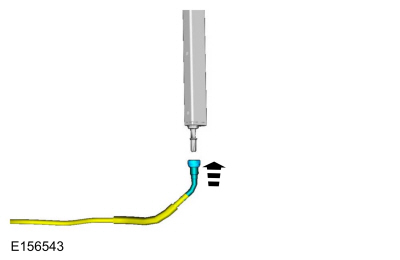
Separate the spring lock coupling from the tube.
 |
Connect
-
Align and push the spring lock coupling onto the tube until fully seated.
 |
-
Pull on the coupling to make sure it is fully engaged.
-
Connect the battery ground cable.
Refer to: Battery Cables (414-01 Battery, Mounting and Cables, Removal and Installation).
 Fuel Tank Draining. General Procedures
Special Tool(s) /
General Equipment
292-00004Fuel Tanker 100 GPM
Activation
Disconnect the battery ground cable...
 Quick Release Coupling. General Procedures
Disconnect
NOTICE:
When reusing liquid or vapor tube connections, make sure to
use compressed air to remove any foreign material from the connector
retaining clip area before separating from the tube or damage to the
tube or connector retaining clip may occur...
Other information:
Lincoln Navigator 2018-2025 Workshop Manual: Tie Rod. Removal and Installation
Special Tool(s) / General Equipment Boot Clamp Pliers Materials Name Specification Motorcraft® Premium Long-Life GreaseXG-1-E1 ESA-M1C75-B Removal Remove the tie rod end. Refer to: Tie Rod End (211-02 Power Steering, Removal and Installation)...
Lincoln Navigator 2018-2025 Workshop Manual: Oil Pan. Removal and Installation
Special Tool(s) / General Equipment Plastic Scraper Oil Drain Equipment Vehicle/Axle Stands Materials Name Specification Motorcraft® High Performance Engine RTV SiliconeTA-357 WSE-M4G323-A6 Motorcraft® Silicone Gasket RemoverZC-30-A, AZC-30-C - Motorcraft® Metal Surface Prep WipesZC-31-B - M..
Categories
- Manuals Home
- 4th Gen Lincoln Navigator Service Manual (2018 - 2025)
- Remote Function Actuator (RFA) Module. Removal and Installation
- Identification Codes. Description and Operation
- Brake Service Mode Activation and Deactivation. General Procedures
- Front Bumper. Removal and Installation
- SYNC Module [APIM]. Removal and Installation
Axle Tube Bearing. Removal and Installation
Special Tool(s) / General Equipment
 205-123
(T78P-1177-A)
205-123
(T78P-1177-A)
Installer, Axle Shaft Oil Seal
 308-047
(T77F-1102-A)
308-047
(T77F-1102-A)
Remover, Bearing Cup Slide Hammer