Lincoln Navigator: Exterior Lighting / Headlamp Control Module (HCM). Removal and Installation
Removal
NOTE: Removal steps in this procedure may contain installation details.
-
NOTE: If installing a new HCM (headlamp control module), it is necessary to upload the module configuration information to the scan tool prior to removing the module. This information must be downloaded into the new HCM (headlamp control module) after installation.
Using a diagnostic scan tool, begin the PMI process for the HCM following the onscreen instructions.
-
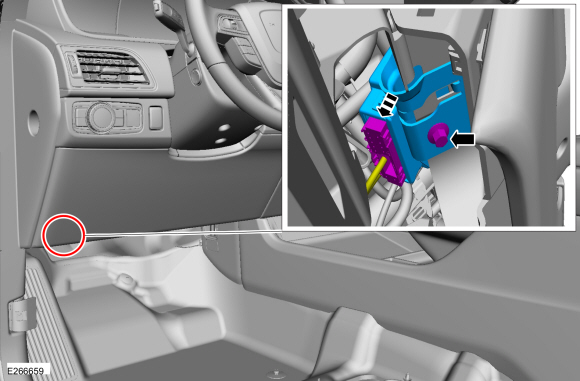
Remove the bolt and the HCM .
-
Disconnect the electrical connector.
Torque: 25 lb.in (2.8 Nm)
-
Disconnect the electrical connector.
 |
-
NOTE: This step is only necessary when installing a new component.
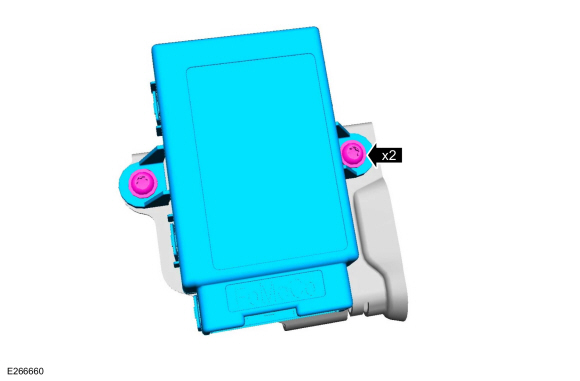
Remove the screws and the HCM from the mounting bracket.
 |
Installation
-
To install, reverse the removal procedure.
-
NOTE: This step is only necessary when installing a new component.
Using a diagnostic scan tool, complete the PMI process for the HCM following the on-screen instructions.
 Headlamp Assembly. Removal and Installation
Removal
NOTE:
Removal steps in this procedure may contain installation details.
NOTE:
LH (left-hand) headlamp assembly shown, RH (right-hand) similar...
 Headlamp Switch. Removal and Installation
Special Tool(s) /
General Equipment
Interior Trim Remover
Removal
NOTE:
Removal steps in this procedure may contain installation details...
Other information:
Lincoln Navigator 2018-2025 Workshop Manual: Specifications
Engine Item Specification Displacement 3.5L Ecoboost (214 CID) No. of cylinders 6 Bore/stroke 92.5/86.7 mm (3.641/3.413 in) Firing order 1-4-2-5-3-6 Spark plug 12405 Spark plug gap 0...
Lincoln Navigator 2018-2025 Workshop Manual: Direct Current/Alternating Current (DC/AC) Inverter. Diagnosis and Testing
Inspection and Verification Before diagnosing or repairing the Direct Current/Alternating Current (DC/AC) Inverter system refer to the Owner's Literature and REFER to: Direct Current/Alternating Current (DC/AC) Inverter - System Operation and Component Description (414-05 Voltage Converter/Inverter, Description and Operation)...
Categories
- Manuals Home
- 4th Gen Lincoln Navigator Service Manual (2018 - 2025)
- Liftgate Trim Panel. Removal and Installation
- All Terrain Control Module (ATCM). Removal and Installation
- Body and Paint
- Body Control Module (BCM). Removal and Installation
- Front Bumper Cover. Removal and Installation
Rear Drive Halfshafts. Diagnosis and Testing
Preliminary Inspection
Visually inspect the CV joints, housing, boots, and clamps for obvious signs of mechanical damage.If an obvious cause for an observed or reported concern is found, correct the cause (if possible) before proceeding to the next step
If the cause is not visually evident, verify the symptom and REFER to Symptom Chart: NVH.