Lincoln Navigator: Body Closures / Power Liftgate Motor. Removal and Installation
Removal
NOTE: Removal steps in this procedure may contain installation details.
NOTE: LH side shown, RH side similar.
-
Remove the loadspace trim panel.
Refer to: Loadspace Trim Panel (501-05 Interior Trim and Ornamentation, Removal and Installation).
-
Remove the rear lamp assembly.
Refer to: Rear Lamp Assembly (417-01 Exterior Lighting, Removal and Installation).
-
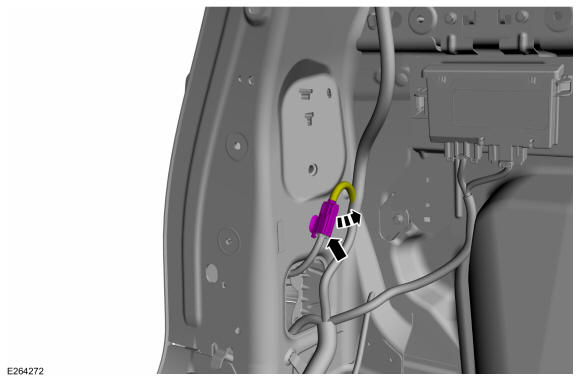
Detach the wire harness retainer and disconnect the electrical connector.
 |
-
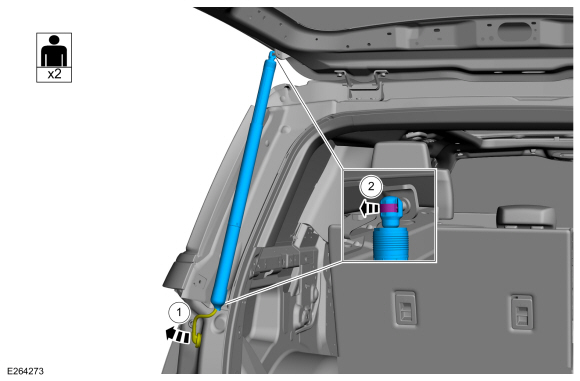
NOTICE: Support the liftgate before removing the power liftgate motor. Failure to follow this direction may result in damage to the components.
NOTE: This step requires the aid of another technician.
Remove the power liftgate motor.
-
Route the power liftgate motor electrical harness through the body.
-
Remove the clips holding the power liftgate motor.
-
Route the power liftgate motor electrical harness through the body.
 |
Installation
-
To install, reverse the removal procedure.
-
Carry out the power liftgate initialization.
Refer to: Power Liftgate Initialization (501-03 Body Closures, General Procedures).
 Liftgate Hinge. Removal and Installation
Removal
NOTE:
Left hand (LH) side shown, right hand (RH) side similar.
Remove the liftgate.
Refer to: Liftgate (501-03 Body Closures, Removal and Installation)...
 Rear Door. Removal and Installation
Special Tool(s) /
General Equipment
Door Lift
Removal
NOTE:
Removal steps in this procedure may contain installation details.
NOTE:
LH side shown, RH side similar...
Other information:
Lincoln Navigator 2018-2025 Workshop Manual: Oil Consumption Test. General Procedures
Nearly all engines consume oil, which is essential for normal lubrication of the cylinder bore walls and pistons and rings. Determining the level of oil consumption may require testing by recording how much oil is being added over a given set of miles...
Lincoln Navigator 2018-2025 Workshop Manual: Shock Absorber and Spring Assembly. Removal and Installation
Removal NOTICE: Suspension fasteners are critical parts that affect the performance of vital components and systems. Failure of these fasteners may result in major service expense. Use the same or equivalent parts if replacement is necessary...
Categories
- Manuals Home
- 4th Gen Lincoln Navigator Service Manual (2018 - 2025)
- Front Seat. Removal and Installation
- Satellite Radio Antenna. Removal and Installation
- Transmission Fluid Level Check. General Procedures
- Rear View Mirrors - System Operation and Component Description. Description and Operation
- Windshield Washer Pump. Removal and Installation
Rear Drive Axle and Differential. Diagnosis and Testing
Symptom Chart(s)
Diagnostics in this manual assume a certain skill level and knowledge of Ford-specific diagnostic practices.
REFER to: Diagnostic Methods (100-00 General Information, Description and Operation).
Symptom Chart - Differential
Symptom Chart - Differential
Condition Actions Axle overheating GO to Pinpoint Test A Broken gear teeth on the ring gear or pinion GO to Pi