Lincoln Navigator: Rear Disc Brake / Rear Brake Flexible Hose. Removal and Installation
Removal
NOTICE: Do not allow the brake fluid to come in contact with the adhesive backing on the brake pads. This may prevent the brake pad adhesive surface from bonding with the brake caliper. If brake fluid is spilled onto the brake pads, install new pads.
NOTICE: If the fluid is spilled on the paintwork, the affected area must be immediately washed down with cold water.
NOTE: Make sure all openings are sealed.
NOTE: Removal steps in this procedure may contain installation details.
-
Remove the wheel and tire.
Refer to: Wheel and Tire (204-04A Wheels and Tires, Removal and Installation).
-
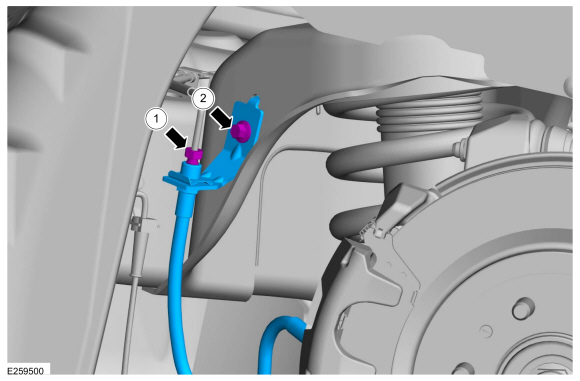
Remove the flow bolt, disconnect the brake hose and
detach the routing bracket from the wiring harness. Discard the washers.
Torque: 30 lb.ft (40 Nm)
 |
-
-
Remove the nut and disconnect the brake tube.
Torque: 177 lb.in (20 Nm)
-
Remove the bolt and the rear brake flexible hose.
Torque: 159 lb.in (18 Nm)
-
Remove the nut and disconnect the brake tube.
 |
Installation
-
NOTE: If equipped, verify correct installation of the brake flexible hose protective sleeve and tie strap.
To install, reverse the removal procedure.
-
Bleed the brake system.
Refer to: Brake System Pressure Bleeding (206-00 Brake System - General Information, General Procedures).
 Brake Pads. Removal and Installation
Special Tool(s) /
General Equipment
Brake Caliper Piston Retractor
Removal
NOTE:
Removal steps in this procedure may contain installation details...

Other information:
Lincoln Navigator 2018-2026 Workshop Manual: Power Steering - System Operation and Component Description. Description and Operation
System Operation System Diagram *.sttxt { visibility: hidden; } *.stcallout { visibility: visible; } ..
Lincoln Navigator 2018-2026 Workshop Manual: Third Row Double Seat Backrest Cover. Removal and Installation
Removal Remove the third row seat head restraint guide sleeves. Refer to: Third Row Seat Head Restraint Guide Sleeve (501-10C Third Row Seats, Removal and Installation). Remove the third row double seat backrest cover and foam as an assembly. NOTICE: Use care when separating the backrest cover from the hook..
Categories
- Manuals Home
- 4th Gen Lincoln Navigator Service Manual (2018 - 2026)
- Body and Paint
- Rear View Mirrors - System Operation and Component Description. Description and Operation
- Transmission Fluid Drain and Refill. General Procedures
- Vehicle Dynamics Control Module (VDM). Removal and Installation
- Neutral Flat Tow Activation and Deactivation. General Procedures
Wheel to Hub Runout Minimization. General Procedures
Check
NOTE: Wheel-to-hub optimization is important. Clearance between the wheel and hub can be used to offset or neutralize the Road Force® or run-out of the wheel and tire assembly. For every 0.001 inch of wheel-to-hub clearance, the Road Force® can be affected between 1 and 3 pounds depending on the tire stiffness.
NOTE: The example below illustrates how the clearance between the wheel and the hub can be used to offset the high spot of radial run-out or Road Force®. Following the procedure will make sure of the best optimization.
Position the wheel and tire assembly on the vehicle so that the high spot location of radial run-out or Road Force® is at the 6 o'clock position and