Lincoln Navigator: Side Panel Sheet Metal Repairs / Rear Door Skin Panel. Removal and Installation
Special Tool(s) /
General Equipment
| 6.5 mm Drill Bit |
| Scraper for Straight Edges |
| Grinder |
| Self-Piercing Rivet (SPR) Remover/Installer |
| Belt Sander |
| Blind Rivet Gun |
| Hot Air Gun |
| Knife |
Materials
| Name |
Specification |
Metal Bonding Adhesive
TA-1, TA-1-B, 3M™ 08115, LORD Fusor® 108B, Henkel Teroson EP 5055 |
-
|
Seam Sealer
TA-2-B, 3M™ 08308, LORD Fusor® 803DTM |
-
|
Removal
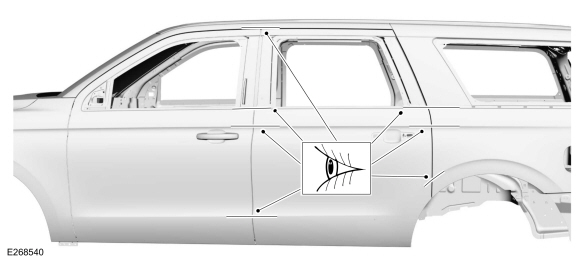
NOTE:
LH side shown, RH side similar.
-
Inspect the door hinges for excessive wear or damage. Install new or rebuild as necessary.
-
Remove the exterior door handle.
Refer to: Exterior Rear Door Handle (501-14 Handles, Locks, Latches and Entry Systems)
.
-
Remove the door window glass.
Refer to: Rear Door Window Glass (501-11 Glass, Frames and Mechanisms, Removal and Installation).
-
Remove the door.
Refer to: Rear Door (501-03 Body Closures, Removal and Installation).
-
Remove the door trim.
Refer to: Rear Door Upper Moulding (501-08 Exterior Trim and Ornamentation, Removal and Installation).
Refer to: Rear Door Moulding (501-08 Exterior Trim and Ornamentation, Removal and Installation).
-
Remove all door assembly weather stripping.
-
Remove the seam sealer from the door hem flange.
Use the General Equipment: Hot Air Gun
Use the General Equipment: Scraper for Straight Edges
-
Remove the SPR fasteners as indicated.
Use the General Equipment: Self-Piercing Rivet (SPR) Remover/Installer
Use the General Equipment: Belt Sander
-
Remove the SPR fasteners as indicated.
Use the General Equipment: Self-Piercing Rivet (SPR) Remover/Installer
Use the General Equipment: Belt Sander
-
Carefully grind the outer layer only of the door skin hem flange as indicated.
Use the General Equipment: Grinder
-
NOTE:
The use of heat may aid in door outer panel removal.
Remove the door skin outer panel.
Use the General Equipment: Hot Air Gun
-
Remove the remaining portion of the door outer panel hem flange.
Use the General Equipment: Knife
Use the General Equipment: Hot Air Gun
Installation
NOTE:
Do not install SPR fasteners directly in old SPR fastener location. SPR
fasteners must be installed adjacent to the original location matching
original quantity.
NOTE:
Solid rivets or blind rivet fasteners may be used in place of SPR fasteners after enlarging existing holes to 6.5 mm.
NOTE:
LH side shown, RH side similar.
-
Using a hammer and dolly dedicated to aluminum repair, straighten any door shell distortion as necessary.
-
80-120 grit sand paper.
Sand to remove all adhesive from the contact area and clean.
-
80-120 grit sandpaper
Sand to remove e-coat from the mating surface and clean.
-
Apply adhesive.
Material: Metal Bonding Adhesive
/ TA-1, TA-1-B, 3M™ 08115, LORD Fusor® 108B, Henkel Teroson EP 5055
-
Apply NVH butyl patches as indicated (obtain locally) to the new door outer panel.
-
NOTICE:
To prevent work-hardening of the metal do not use
the hammer and dolly method for closing the hem flange. A hem flanging
tool designed to work with aluminum is the preferred method.
Install, clamp and partially close the flange. Remove the clamp after partially closing the flange.
-
Install the door on the vehicle.
-
Check the door panel for proper fit and alignment.
-
Drill for fasteners.
Use the General Equipment: 6.5 mm Drill Bit
-
NOTE:
Do not install SPR fasteners directly in old SPR fastener location. SPR
fasteners must be installed adjacent to the original location matching
original quantity.
NOTE:
Solid rivets or blind rivet fasteners may be used in place of SPR fasteners after enlarging existing holes to 6.5 mm.
Install fasteners.
|
Item
|
SPR Number
|
SPR Code
|
Henrob® Mandrel
|
Pro-Spot® Mandrel
|
Blind Rivet
|
Solid Rivet
|
Rivnut®
|
|
1
|
-
|
-
|
-
|
-
|
W702512-S900C
|
W790376-S900
|
-
|
Use the General Equipment: Blind Rivet Gun
-
Remove the door from the vehicle.
-
NOTICE:
To prevent work-hardening of the metal do not use
the hammer and dolly method for closing the hem flange. A hem flanging
tool designed to work with aluminum is the preferred method.
NOTE:
Smooth residual adhesive squeeze-out in to seam to act as a sealer.
Complete the hemming process.
-
Sand and clean for primer application.
-
Apply a Ford approved primer to the entire flange repair area.
-
Seam Sealing:
All seams must be sealed to production level.
Material: Seam Sealer
/ TA-2-B, 3M™ 08308, LORD Fusor® 803DTM
-
Refinish the door shell flange using a Ford approved paint system and typical refinishing techniques.
-
Install all door weather stripping.
-
Install the door.
Refer to: Rear Door (501-03 Body Closures, Removal and Installation).
-
Refinish the entire repair using a Ford approved paint system and typical refinishing techniques.
-
Install the exterior door handle.
Refer to: Exterior Rear Door Handle (501-14 Handles, Locks, Latches and Entry Systems)
.
-
Install the rear door window glass.
Refer to: Rear Door Window Glass (501-11 Glass, Frames and Mechanisms, Removal and Installation).
-
Install the exterior door trim.
Refer to: Front Door Moulding (501-08 Exterior Trim and Ornamentation, Removal and Installation).
Refer to: Front Door Moulding (501-08 Exterior Trim and Ornamentation, Removal and Installation).
-
Install door weather stripping.
-
Align the door as necessary.
Refer to: Rear Door Alignment (501-03 Body Closures, General Procedures).
Special Tool(s) /
General Equipment
6.5 mm Drill Bit
Spherical Cutter
Self-Piercing Rivet (SPR) Remover/Installer
Belt Sander
Air Body Saw
MIG/MAG Welding Equipment
Locking Pliers
Materials
Name
Specification
Metal Bonding AdhesiveTA-1, TA-1-B, 3M™ 08115, LORD Fusor® 108B, Henkel Teroson EP 5055
-
..
Other information:
Special Tool(s) /
General Equipment
6.5 mm Drill Bit
11 mm Drill Bit
Rivet Gun
Self-Piercing Rivet (SPR) Remover/Installer
Belt Sander
Hot Air Gun
8 mm Drill Bit
Locking Pliers
Materials
Name
Specification
Metal Bonding AdhesiveTA-1, TA-1-B, 3M™ 08115, LORD Fusor® 108B, Henkel Teroson EP 5055
-
..
Removal
Remove the main control valve body.
Refer to: Main Control Valve Body (307-01 Automatic Transmission -
10-Speed Automatic Transmission – 10R80, Removal and Installation).
Disconnect the TFT sensor.
Slide the plastic lock to the unlocked position.
While pressing the plastic tab, disconnect the electrical connector.
..


 Rocker Panel. Removal and Installation
 205-1016
 205-153
(T80T-4000-W)
205-153
(T80T-4000-W)
 205-D061
(D83T-4205-C2)
205-D061
(D83T-4205-C2)