Lincoln Navigator: Second Row Seats / Second Row Single Seat Cushion Cover - Vehicles With: Multi-Contour Seats. Removal and Installation
Special Tool(s) / General Equipment
| Interior Trim Remover |
Removal
NOTE: Right hand (RH) shown, left hand (LH) similar.
NOTE: Removal steps in this procedure may contain installation details.
-
Remove the second row seat.
Refer to: Second Row Seat (501-10B Second Row Seats, Removal and Installation).
-
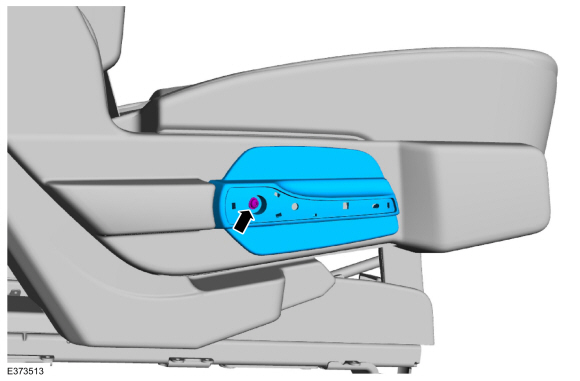
Release the retainers and remove the recline handle cover.
Use the General Equipment: Interior Trim Remover
 |
-
Remove screw and the recline handle.
 |
-
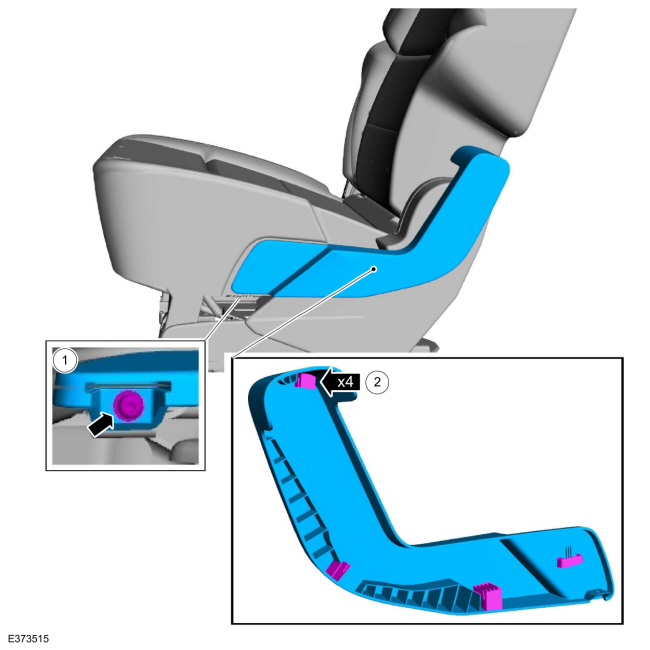
Remove the second row single seat outboard backrest pivot arm cover.
-
Remove the second row single seat outboard backrest pivot arm cover screws.
-
Release the second row single seat outboard backrest pivot arm cover clip.
-
Release the second row single seat outboard backrest pivot arm cover retainers.
-
Remove the second row single seat outboard backrest pivot arm cover screws.
 |
-
Remove the second row single seat inboard backrest pivot arm cover.
-
Remove the second row single seat inboard backrest pivot arm cover screw.
-
Release the second row single seat inboard backrest pivot arm cover retainers.
-
Remove the second row single seat inboard backrest pivot arm cover screw.
 |
-
Release the second row single seat cushion cover J-clips.
-
Release the second row single seat cushion cover J-clip strap.
-
Release the second row single seat cushion cover inboard J-clips.
-
Release the second row single seat cushion cover front J-clips.
-
Release the second row single seat cushion cover outboard J-clips.
-
Release the second row single seat cushion cover J-clip strap.
 |
-
Remove the second row single seat backrest pivot arm bolts.
Torque: 133 lb.in (15 Nm)
 |
-
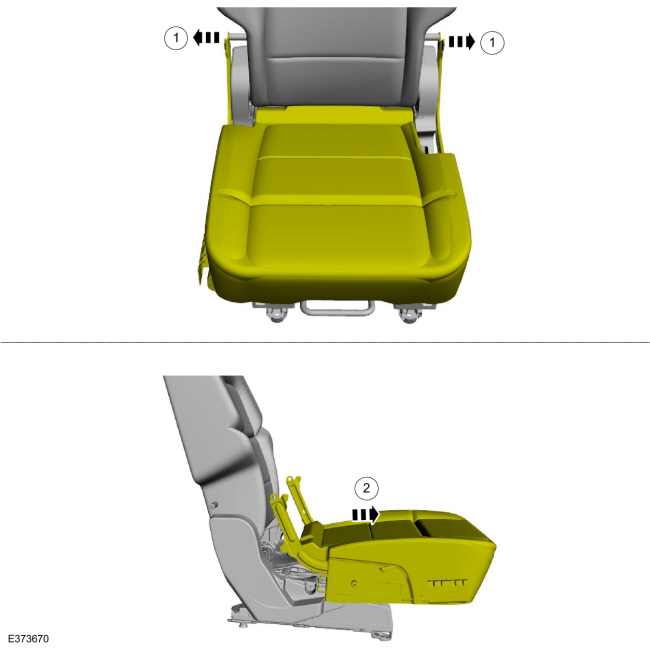
Position the second row single seat cushion forward.
-
Release the second row single seat backrest pivot arm bracket from the second row single seat backrest.
-
Position the second row single seat cushion forward.
-
Release the second row single seat backrest pivot arm bracket from the second row single seat backrest.
 |
-
Disconnect the second row seat power lumbar assembly air line.
-
Press inward on the second row seat power lumbar assembly air line retainer.
-
Pull outward on the second row seat power lumbar assembly air line.
-
Press inward on the second row seat power lumbar assembly air line retainer.
 |
-
Position the second row single seat cushion upward.
 |
-
Position the second row single seat cushion heater wire harness aside.
-
Disconnect the second row single seat cushion heater electrical connector.
-
Release the second row single seat cushion heater wire harness retainer.
-
Disconnect the second row single seat cushion heater electrical connector.
 |
-
Remove the second row single seat cushion cover and foam as an assembly.
-
Release the second row single seat cushion cover rear J-clip.
-
Remove the second row single seat cushion cover and foam assembly.
-
Release the second row single seat cushion cover rear J-clip.
 |
-
NOTICE: Use care when separating the cushion trim cover from the hook-and-loop strips, or the hook-and-loop strips may be torn from the cushion foam.
NOTICE: Use care when separating the cushion trim cover from the hook-and-arrows, or the hooks can be torn from the cushion foam.
NOTE: This step is only necessary when installing a new component.
Remove the second row single seat cushion cover.
-
Invert the cover.
-
Release the hook-and-loop strips.
-
Release the hook-and-arrows.
-
Invert the cover.
 |
Installation
-
To install, reverse the removal procedure.
 Second Row Single Seat Backrest Cover - Vehicles With: Multi-Contour Seats. Removal and Installation
Special Tool(s) /
General Equipment
Interior Trim Remover
Removal
NOTE:
Right hand (RH) shown, left hand (LH) similar.
NOTE:
Removal steps in this procedure may contain installation details...
 Second Row Single Seat Cushion Cover. Removal and Installation
Special Tool(s) /
General Equipment
Interior Trim Remover
Removal
NOTE:
Removal steps in this procedure may contain installation details...
Other information:
Lincoln Navigator 2018-2024 Workshop Manual: D Clutch. Diagnosis and Testing
Symptom Chart D Clutch For D clutch operation, REFER to: D Clutch (307-01 Automatic Transmission - 10-Speed Automatic Transmission – 10R80, Description and Operation). D Clutch Condition Possible Sources Action D clutch does not apply SSD mechanically stuck OFF INSTALL a new sole..
Lincoln Navigator 2018-2024 Workshop Manual: C-Pillar Trim Panel. Removal and Installation
Special Tool(s) / General Equipment Interior Trim Remover Removal NOTE: Left hand (LH) shown, right hand (RH) similar. NOTE: Removal steps in this procedure may contain installation details. Position the rear door weatherstrip aside. Position the rear door weatherstrip aside. ..
Categories
- Manuals Home
- 4th Gen Lincoln Navigator Service Manual (2018 - 2024)
- Rear Suspension Height Sensor. Removal and Installation
- Floor Console. Removal and Installation
- Identification Codes. Description and Operation
- Body and Paint
- Power Running Board (PRB). Diagnosis and Testing
Front Stabilizer Bar Link. Removal and Installation
Removal
NOTICE: Suspension fasteners are critical parts that affect the performance of vital components and systems. Failure of these fasteners may result in major service expense. Use the same or equivalent parts if replacement is necessary. Do not use a replacement part of lesser quality or substitute design. Tighten fasteners as specified.
NOTE: Removal steps in this procedure may contain installation details.
With the vehicle in NEUTRAL, position it on a hoist.Refer to: Jacking and Lifting (100-02 Jacking and Lifting, Description and Operation).
NOTICE: Do not use power tools to remove or install the stabilizer bar