Lincoln Navigator: Glass, Frames and Mechanisms / Front Door Window Regulator and Motor. Removal and Installation
Special Tool(s) / General Equipment
| Interior Trim Remover |
Removal
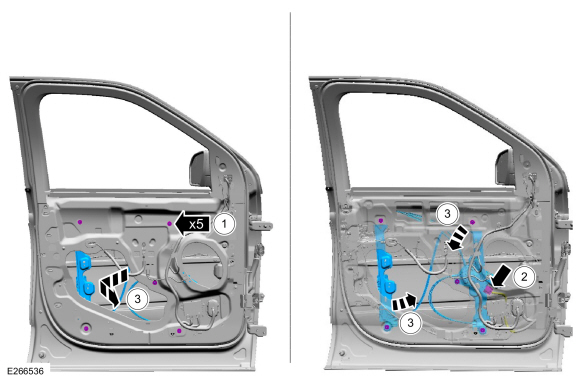
NOTE: LH side shown, RH side similar.
NOTE: For non-functional front door window regulators and motors with the window in the 40 mm open to full closed position, cut the front door window regulator cables to allow window movement.
NOTE: Removal steps in this procedure may contain installation details.
-
Remove the front door trim panel.
Refer to: Front Door Trim Panel (501-05 Interior Trim and Ornamentation, Removal and Installation).
-
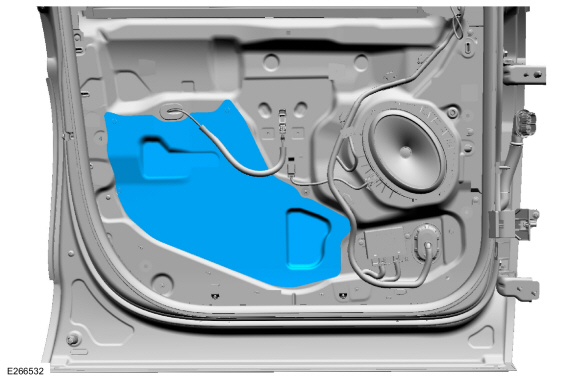
Remove the watershield.
 |
-
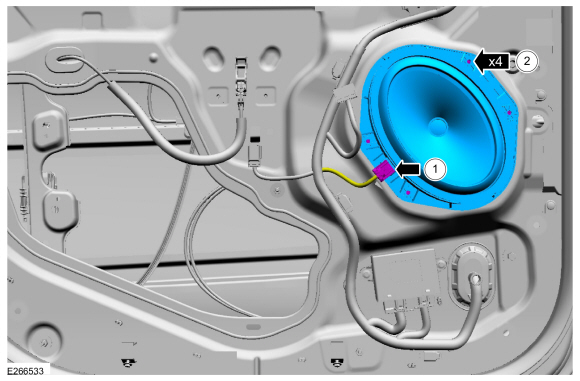
Remove the front door speaker.
-
Disconnect the wiring harness electrical connector from the front door speaker.
-
Remove the screws and the front door speaker.
Torque: 13 lb.in (1.5 Nm)
-
Disconnect the wiring harness electrical connector from the front door speaker.
 |
-
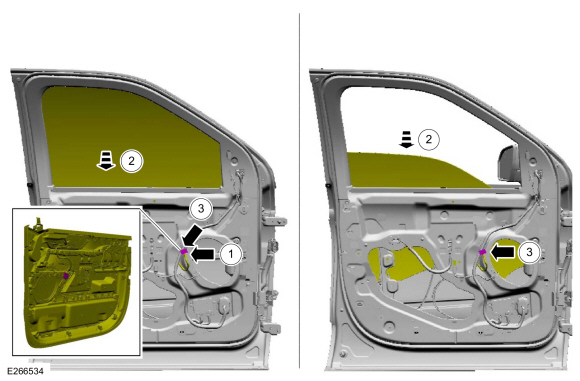
Position the front door window glass to the three quarters down position.
-
Connect the front door trim panel electrical connector.
-
Position the front door window glass to the three quarters down position.
-
Disconnect the front door trim panel electrical connector.
-
Connect the front door trim panel electrical connector.
 |
-
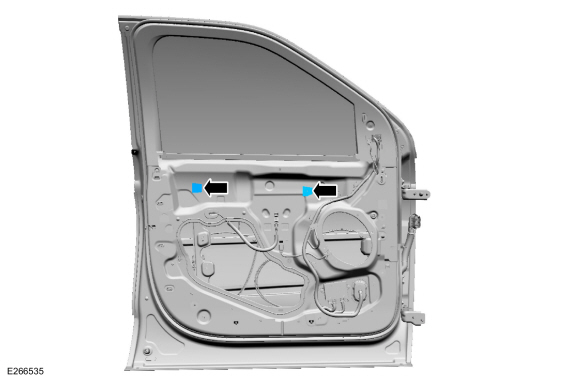
Release the front door window glass and tape in the full up position.
-
Release the front door window glass retaining clips.
Use the General Equipment: Interior Trim Remover
-
Raise the front door window glass to the full up position.
-
Tape the front door window glass in the full up position.
-
Release the front door window glass retaining clips.
 |
-
Remove the front door window regulator nut adhesive covers.
 |
-
Remove the front door window regulator and motor.
-
Remove the front door window regulator nuts.
Torque: 93 lb.in (10.5 Nm)
-
Disconnect the front door window motor electrical connector.
-
Remove the front door window regulator and motor.
-
Remove the front door window regulator nuts.
 |
-
NOTE: This step is only necessary when installing a new component.
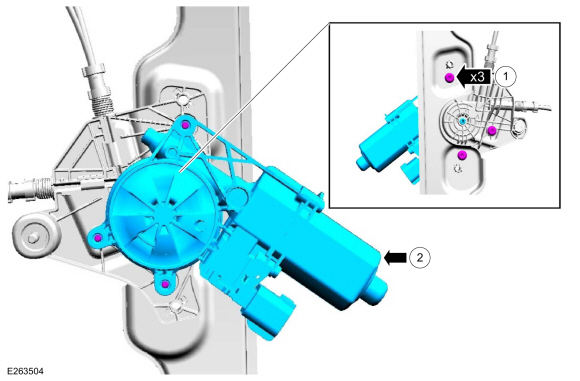
Remove the front door window regulator motor.
-
Remove the front door window regulator motor bolts.
-
Remove the front door window regulator motor.
-
Remove the front door window regulator motor bolts.
 |
Installation
-
To install, reverse the removal procedure.
-
Carry out the power door window initialization.
Refer to: Power Door Window Initialization (501-11 Glass, Frames and Mechanisms, General Procedures).
 Front Door Window Regulator Motor. Removal and Installation
Removal
NOTE:
LH side shown, RH side similar.
NOTE:
For non-functional front door window regulators and motors
with the window in the 40 mm open to full closed position, cut the front
door window regulator cables to allow window movement...
 Liftgate Window Glass. Removal and Installation
Removal
NOTE:
Removal steps in this procedure may contain installation details.
Open the liftgate window glass.
NOTE:
Liftgate shown closed for clarity...
Other information:
Lincoln Navigator 2018-2024 Workshop Manual: Differential Bearings. Removal and Installation
Special Tool(s) / General Equipment 100-002 (TOOL-4201-C) Holding Fixture with Dial Indicator Gauge 205-001 (TOOL-4000-E) Spreader, Differential Carrier 205-005 (T53T-4621-C) Installer, Drive Pinion Bearing Cone 205-010 (T57L-4221-A2) Installer, Differential Side Bearing 205-024 (T67P-4616-A) Installer, Drive Pinion Bearin..
Lincoln Navigator 2018-2024 Workshop Manual: Charge Air Cooler (CAC) Cleaning. General Procedures
Materials Name Specification Motorcraft® Metal Brake Parts CleanerPM-4-A, PM-4-B, APM-4-C - Cleaning NOTICE: Do not use a high-pressure power washer to clean the CAC or damage to the CAC may occur. Remove electrical components and sensors from the CAC . Drain all contaminates such as coolant, fuel and oil prior to cleanin..
Categories
- Manuals Home
- 4th Gen Lincoln Navigator Service Manual (2018 - 2024)
- SYNC Module [APIM]. Removal and Installation
- Front Seat. Removal and Installation
- Body and Paint
- Floor Console. Removal and Installation
- Front Bumper. Removal and Installation
Differential Case Runout Check. General Procedures
Special Tool(s) / General Equipment
 205-1016
Installer, Differential Bearing
TKIT-2014D-ROW2
TKIT-2014D-FL_ROW
 205-153
(T80T-4000-W)
205-153
(T80T-4000-W)
Handle
 205-D061
(D83T-4205-C2)
205-D061
(D83T-4205-C2)
Step Plate Dial Indicator Three Leg Puller Punch