Lincoln Navigator: Parking Aid / Front Parking Aid Sensor. Removal and Installation
Removal
NOTE: Removal steps in this procedure may contain installation details.
NOTE: RH side shown, LH side similar.
-
With the vehicle in NEUTRAL, position it on a hoist.
Refer to: Jacking and Lifting (100-02 Jacking and Lifting, Description and Operation).
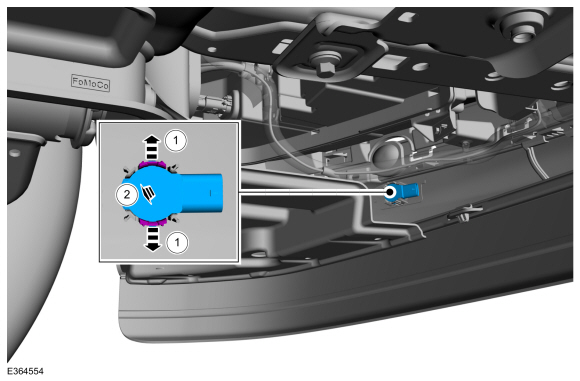
Outer sensors
-
Disconnect the front outer parking aid sensor electrical connector.
 |
-
Remove the front outer parking aid sensor.
-
Release the tabs.
-
Remove the parking aid sensor.
-
Release the tabs.
 |
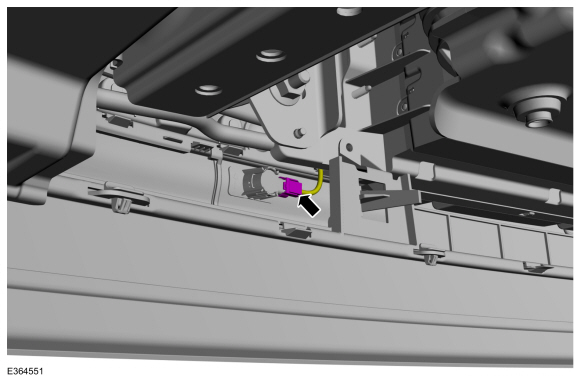
Inner sensors
-
Disconnect the front inner parking aid sensor electrical connector.
 |
-
Remove the front inner parking aid sensor.
-
Release the tabs.
-
Remove the parking aid sensor.
-
Release the tabs.
 |
Installation
NOTE: Make sure that the isolator rings are installed correctly while installing the sensors.
-
To install, reverse the removal procedure.
-
Carry out the azimuth checks.
Refer to: Azimuth System Check (413-13A Parking Aid, General Procedures).
-
Carry out the elevation system check.
Refer to: Elevation System Check (413-13A Parking Aid, General Procedures).
-
If any sensor fails the checks, diagnose the sensor fault.
Refer to: Parking Aid - System Operation and Component Description (413-13A Parking Aid, Description and Operation).
 Elevation System Check. General Procedures
Check
Turn the ignition ON, engine OFF.
Set the parking brake.
Place the gearshift in REVERSE (R) for rear parking aid sensors...
 Rear Parking Aid Sensor. Removal and Installation
Removal
NOTE:
Removal steps in this procedure may contain installation details.
Remove the rear bumper cover.
Refer to: Rear Bumper Cover (501-19 Bumpers, Removal and Installation)...
Other information:
Lincoln Navigator 2018-2025 Workshop Manual: Differential Fluid Level Check. General Procedures
Materials Name Specification Motorcraft® SAE 75W-85 Premium Synthetic Hypoid Gear LubricantXY-75W85-QL WSS-M2C942-A Check With the vehicle in NEUTRAL, position it on a hoist. Refer to: Jacking and Lifting (100-02 Jacking and Lifting, Description and Operation)...
Lincoln Navigator 2018-2025 Workshop Manual: Windshield Wiper Motor. Removal and Installation
Removal NOTE: Removal steps in this procedure may contain installation details. NOTE: The hood is removed in this procedure for clarity. Remove the cowl panel grill. Refer to: Cowl Panel Grille (501-02 Front End Body Panels, Removal and Installation)...
Categories
- Manuals Home
- 4th Gen Lincoln Navigator Service Manual (2018 - 2025)
- Remote Function Actuator (RFA) Module. Removal and Installation
- SYNC Module [APIM]. Removal and Installation
- Rear View Mirrors - System Operation and Component Description. Description and Operation
- Vehicle Dynamics Control Module (VDM). Removal and Installation
- Transmission Fluid Level Check. General Procedures
Rear Camber Adjustment. General Procedures
Special Tool(s) / General Equipment
Wheel Alignment SystemActivation
NOTICE: Suspension fasteners are critical parts that affect the performance of vital components and systems. Failure of these fasteners may result in major service expense. Use the same or equivalent parts if replacement is necessary. Do not use a replacement part of lesser quality or substitute design. Tighten fasteners as specified.
Using alignment equipment and the manufacturer's instructions, measure the rear camber.Use the General Equipment: Wheel Alignment System