Lincoln Navigator: Body Closures / Rear Door Alignment. General Procedures
Inspection
NOTE: LH side shown, RH side similar.
NOTE: Short wheelbase shown, long wheelbase similar.
-
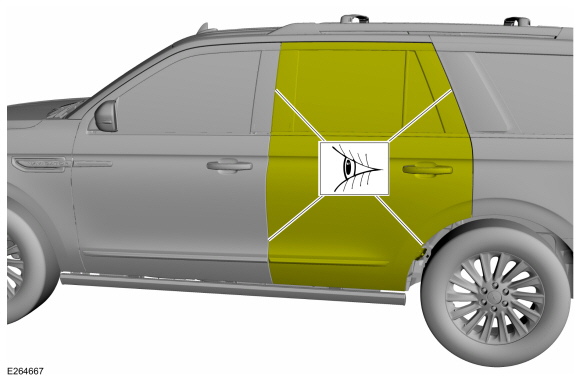
Inspect the rear door-to-body dimensions.
Refer to: Body and Frame (501-26 Body Repairs - Vehicle Specific Information and Tolerance Checks, Description and Operation).
Adjustment
All alignments
-
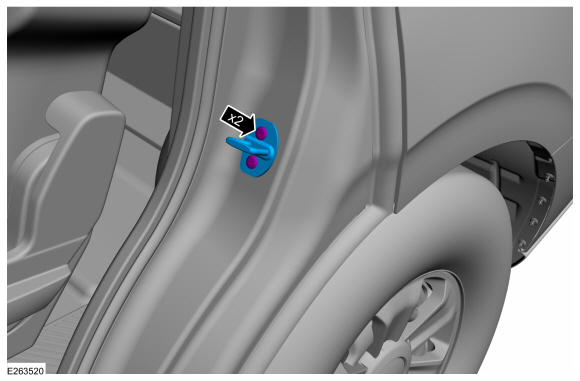
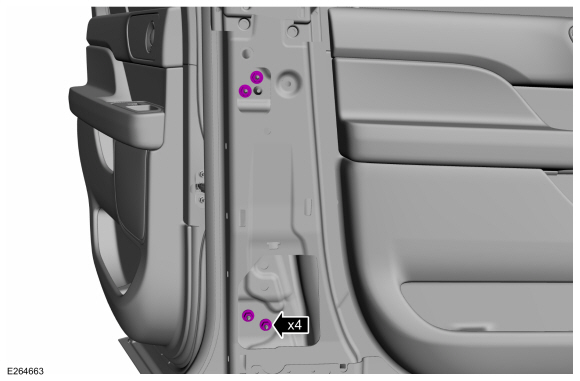
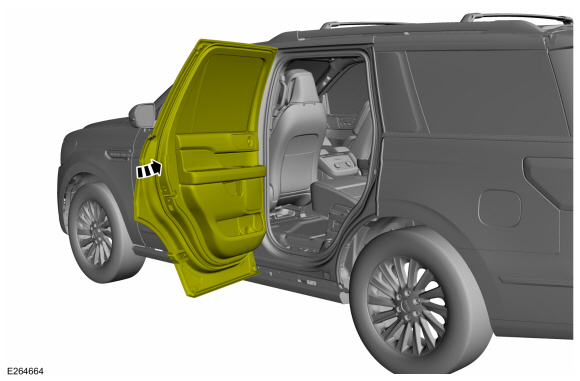
Open the rear door.
 |
-
Remove the bolts and the striker assembly.
 |
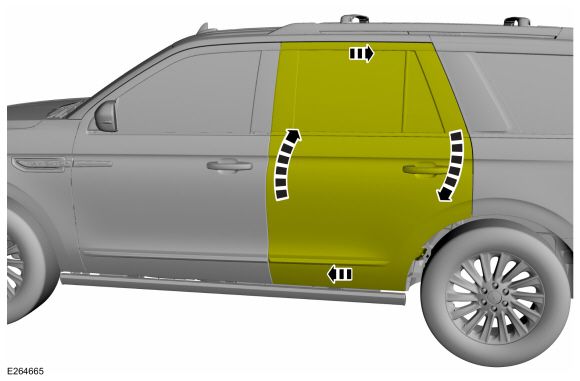
Rear door in and out, up and down alignment
-
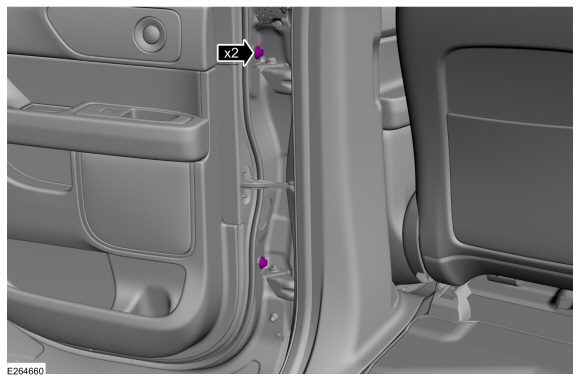
Loosen the bolts to permit movement of the door.
 |
-
Adjust the door to specification.
Refer to: Body and Frame (501-26 Body Repairs - Vehicle Specific Information and Tolerance Checks, Description and Operation).
 |
-
Tighten the bolts.
Torque: 35 lb.ft (48 Nm)
|
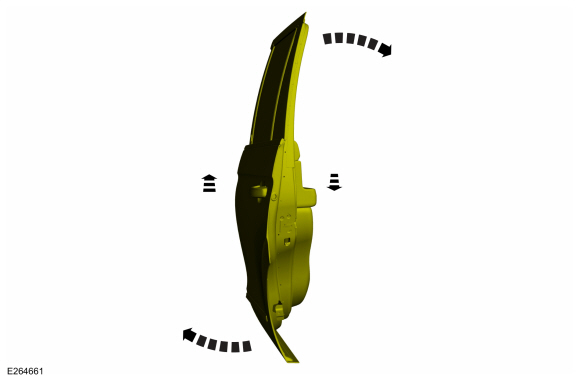
Rear door fore, aft and tilt alignment
-
Remove the lower B-pillar trim panel.
Refer to: B-Pillar Trim Panel (501-05 Interior Trim and Ornamentation, Removal and Installation).
-
Depower the SRS .
Refer to: Supplemental Restraint System (SRS) Depowering (501-20B Supplemental Restraint System, General Procedures).
-
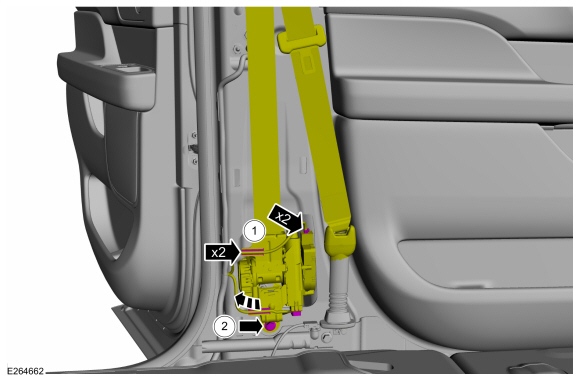
Position aside the safety belt retractor.
-
Detach the wire harness retainers and disconnect the electrical connectors.
-
Remove the screw.
-
Detach the wire harness retainers and disconnect the electrical connectors.
 |
-
Loosen the nuts to permit movement of the door.
 |
-
Carefully close the rear door.
 |
-
Adjust the door to specification.
Refer to: Body and Frame (501-26 Body Repairs - Vehicle Specific Information and Tolerance Checks, Description and Operation).
 |
-
Carefully open the rear door.
|
-
Tighten the nuts.
Torque: 24 lb.ft (32 Nm)
|
-
NOTE: During installation, make sure the safety belt webbing is not twisted and the safety belts and buckles are accessible to the occupants.
Position the safety belt retractor.
-
Position the safety belt retractor and install the screw.
Torque: 30 lb.ft (40 Nm)
-
Connect the electrical connectors and attach the wire harness retainers.
-
Position the safety belt retractor and install the screw.
 |
-
Install the lower B-pillar trim panel.
Refer to: B-Pillar Trim Panel (501-05 Interior Trim and Ornamentation, Removal and Installation).
-
Repower the SRS .
Refer to: Supplemental Restraint System (SRS) Repowering (501-20B Supplemental Restraint System, General Procedures).
-
Check the active restraint system for correct operation.
Refer to: Seatbelt Systems (501-20A Seatbelt Systems, Diagnosis and Testing).
All alignments
-
Install the striker assembly.
Torque: 18 lb.ft (25 Nm)
|
-
Inspect the body-to-rear door dimensions.
Refer to: Body and Frame (501-26 Body Repairs - Vehicle Specific Information and Tolerance Checks, Description and Operation).
 |
 Power Liftgate Initialization. General Procedures
Initialization
Disconnect the battery or remove the RGTM fuse(s).
Refer to: Battery Disconnect and Connect (414-01 Battery, Mounting and Cables, General Procedures)...
 Front Door. Removal and Installation
Special Tool(s) /
General Equipment
Door Lift
Removal
NOTE:
Removal steps in this procedure may contain installation details.
NOTE:
LH side shown, RH side similar...
Other information:
Lincoln Navigator 2018-2025 Workshop Manual: Adaptive Learning Drive Cycle. General Procedures
Programming NOTE: Perform the adaptive learning drive cycle on a level road surface. Using the scan tool, clear the DTCs (Diagnostic Trouble Codes) and Transmission Adaptive Tables. Drive the vehicle until the engine and transmission reach normal operating temperature...
Lincoln Navigator 2018-2025 Workshop Manual: Crankshaft Pulley. Removal and Installation
Special Tool(s) / General Equipment 303-102Installer, Crankshaft Pulley Strap Wrench Three Leg Puller Removal NOTICE: During engine repair procedures, cleanliness is extremely important. Any foreign material, including any material created while cleaning gasket surfaces, that enters the oil passages, coolant passages or the oil pan may cause en..
Categories
- Manuals Home
- 4th Gen Lincoln Navigator Service Manual (2018 - 2025)
- Windshield Washer Pump. Removal and Installation
- Front Bumper Cover. Removal and Installation
- Transmission Fluid Level Check. General Procedures
- Power Running Board (PRB). Diagnosis and Testing
- Identification Codes. Description and Operation
Rear Drive Halfshafts. Diagnosis and Testing
Preliminary Inspection
Visually inspect the CV joints, housing, boots, and clamps for obvious signs of mechanical damage.If an obvious cause for an observed or reported concern is found, correct the cause (if possible) before proceeding to the next step
If the cause is not visually evident, verify the symptom and REFER to Symptom Chart: NVH.